 |
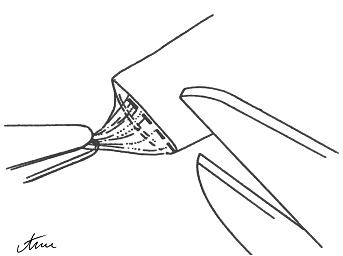
Adventitial stripping using scissors. |
Advanced microsurgery 2. In vivo laboratory surgery
Arterial end-to-end anastomosis of the rat carotid artery
with 8 interrupted sutures (according to Yonekawa).
(See also
figures of microsurgery exercises, chapter: "End-to-end anastomosis
on 1.0-1.2 mm diameter vessels ex vivo")
Preparation
The order of the stitches on a vessel
Removal of the clips
Patency tests
End-to-end anastomosis with
continuous suture
Venous end-to-end anastomosis
Arterial end-to-side anastomosis
The
arteriotomy
Anastomosis with interrupted sutures
Carotid-to-carotid anastomosis
Femoral arterio-venous fistula
End-to-side
anastomosis with continuous suture
Anastomosis technique
for
peripheral nerves
Background
Access to the sciatic nerve
Trimming the axons
Epineural approximation
Perineural suture
Interposed/jump graft
[ back to top ]
Preparation
• Under high magnification place
background material behind the dissected vessel. Place two approximator clips
(first proximally then distally) on the artery and cut it completely through
with scissors perpendicularly to its axis.
• The lumen should be irrigated in
both directions with a solution containing high concentration of heparin.
• The adventitia should be removed in
a few millimeter distance from the edges (using forceps and scissors).
 |
Adventitial stripping using scissors. |
• Dilation: this minimizes spasm and enlarges the lumen so that you can see and suture the vessel ends safely. Hold the vessel end by the adventia with a forceps and gently introduce a dilating forceps inside the lumen. Delicately dilate to a maximum of 1.5 times the natural diameter of the vessel.
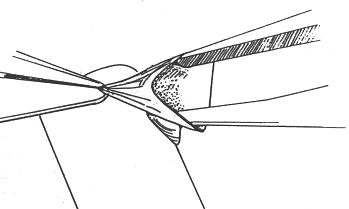 |
Dilation in order to reduce spasm. |
• Move the two clamps of the approximator closer together, so that there is about a 1 mm distance between the vessel ends.
 |
|
It is important to include the muscle and also the intima into the stitch (left) (Carrel 1907, Jacobson 1960, Jassinowsky 1889), and not only the muscle (middle) or the adventitia (right). |
[ back to top ]
The order of the stitches on a vessel
Frontal
surface: (1) stitch at "12 o’clock",
(2) stitch at
"6 o’clock",
(3) place a silastic cannula into the lumen
(4) stitch at
"3 o’clock",
(5) stitch at “1.5 o’clock",
(6) stitch at
"4.5 o’clock",
Dorsal
surface: (7) stitch at 1.5 o’clock",
(8) continuous suture which consists of 2 steps:
stitch at
"3 o’clock",
stitch at
"4.5 o’clock",
(9) removal of the silastic cannula, knotting.
[ back to top ]
Removal of the clips
• Open the caudal clamp of the
approximator first followed by the cranial one.
• Apply compression with a small
gauze or cotton ball for 2-3 minutes to stop bleeding.
• If the anastomosis still bleeds,
identify the source and place supplementary sutures to stop it.
• Test the patency of the anastomosis
and close up the skin.
[ back to top ]
Patency tests
• Direct
observation through the operating microscope: transversal pulsation cranially
(dynamic changes in diameter of the vessel) from the anastomosis and that of the
caudal segment of the vessel indicate patency of the anastomosis. Longitudinal
pulsations reveal obstruction of the anastomosis.
• “Uplift test": Lift the vessel caudally to the anastomosis with forceps, until
it collapses. It will pulsate, when lowered, if the anastomosis is patent.
• The “empty-and-refill test": Clamp the artery with a forceps immediately
caudal to the anastomosis, and then close the artery again with a second
forceps, immediately near the first one. Slide the second forceps over the
artery in the direction of the blood flow, keeping it closed and release the
first forceps. An almost instant filling of the emptied segment of the artery
proves patency of the anastomosis. Any delay, is a sign that the anastomosis is
partially blocked (involvement of the adventitia in the lumen or to a throug
-stitch). If there is no filling and the vessel remains collapsed the
anastomosis has completely failed.
• Opening the anastomosis: after ligating the repaired vessel both cranially and
caudally, cut out the anastomosis, transect it longitudinally opening it as a
book and evaluate the internal aspects of the sutures underneath the operating
microscope.
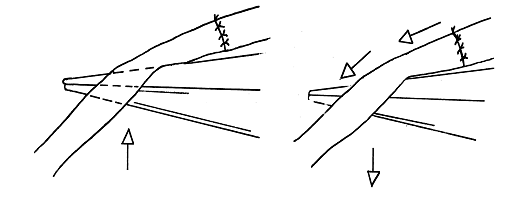 |
The “uplift test" |
|
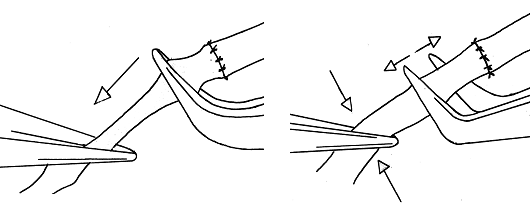 |
The “empty-and-refill test" |
[ back to top ]
End-to-end anastomosis with continuous suture
Contrary to
macrovascular surgical practice, the end-to-end continuous suture is rarely used
in microsurgery, especially when arteries are concerned. Still, if correctly
performed, this type of anastomosis can produce results that are just as good as
anastomosis with separate threads (Mao 1986). Additionally, this
technique is considerably faster: there are no knots to tie, no thread ends to
cut, and therefore no need to change the instruments in your hands. It is
important to use a short thread (3-5 cm) in order to reduce trauma which occurs
when the passage of the suture material through the vessel walls is lengthy.
Preparing
the artery involves the same steps as the end-to-end suture with separate
threads. Apply the microapproximator, section the artery, and prepare the vessel
ends. Place the first stay suture "at 3 hr" and tie the knot, leaving one of the
thread ends longer so that it will serve to make another knot. Place the second
stay suture at 180° in respect to the other, leaving the "short end" also
longer. Continue with suturing at the posterior wall, than after knotting it;
finish with suturing the anterior wall.
After the
first two initial stitches, further 4-5 stitches are usually necessary.
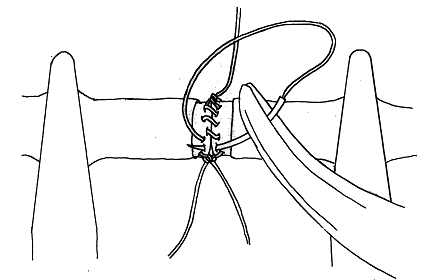 |
Anastomosis with continuous suture |
Important details
• In
order to avoid any future bleeding of the anastomosis, place the first and the
last passes as close to the stay sutures as possible.
• Place the sutures with great
accuracy, perpendicular on the margins of the vessel, as you would suture with
separate stitches.
• In order to prevent inclusion of
the posterior wall into the stitch:
- lift the
margin of the vessel, introduce and open a forceps in the lumen of the vessel or
pick up the adventitia;
- when the
tip of the needle is inside the lumen, keep its position parallel to the axis of
the vessel;
- always
follow the tip of the needle visually and control its exact location.
• Tie the knot with one of the short
ends of the other stay suture.
• The greatest risk in performing
this maneuver is the over-tightening of the anastomosis which produces stenosis
of your anastomosis. This can be prevented by dilating the anastomosis up to 1.5
times its natural diameter which can be easily performed after the first two
stitches.
• Cut the thread ends, irrigate the
operating field with saline solution, and open the caudal clamp. After a few
seconds open the cranial clamp as well, and remove the microapproximator. Gently
compress the anastomosis for about 2-3 minutes. Verify if there are any bleeding
sites and perform the patency tests.
[ back to top ]
Venous end-to-end anastomosis
• Under a
high magnification, place a background material behind the prepared vessel, and
place two approximator clips (first proximally then distally). Cut it completely
through with scissors perpendicularly to its axis.
• Irrigate and clean not only the lumen, but the entire wound of any blood or
tissue traces. Leave some saline solution in the wound so that the vein ends can
float in a minimum quantity of liquid.
• Minimally remove the fragments of adventitia, being careful not to cut the
venous wall.
• Grab the adventitia with fine forceps and placing the tips of another one
dilate the vessel ends gently.
• Bring the approximator clips closer to each other so that there is about a 1
mm distance between the vessel ends (similar to that performed in case of
arterial anastomosis). The distance between the edge of the vessel and the
penetration point of the needle should be approximately twice the diameter of
the needle.
• While inserting the needle, do not involve the posterior wall in the suture.
To accomplish this, always support the venous wall with forceps tips carefully
inserted into the lumen.
• The distance between the sutures should be double in comparison with the
arterial suture, because the pressure of the blood flow is much lower in the
vein. Thus, although the diameter of the vein is nearly double the arterial one,
you will complete the anastomosis with approximately the same number of
stitches.
• After cutting the thread, irrigate the field, remove the microapproximators in
the following order: first the proximal one and then the distal one.
• Patency test: After removing the microclamps, the vein should fully dilate and
regain its cylindrical shape at the anastomosis site. In case of a distortion or
a stricture, it is possible that you involved the posterior wall in the suture,
and you should reapply the microapproximators, exploring the anastomosis and
correcting the sutures.
Direct patency signs
• Fully dilated anastomosis, same diameter and blood color
distally and proximally to the anastomosis. If the anastomosis is thrombosed,
the vein has a larger diameter and the blood is darker distal to the anastomosis.
• "Empty-and-refill test": if we move a caudally places forceps away from the
anastomosis and the vessel refills. An almost instant filling of the emptied
segment proves the patency of the anastomosis. Any delay, is a sign that the
anastomosis is partially blocked (involvement of the adventitia in the lumen or
to a through-stitch). If there is no filling and the vessel remains collapsed
the anastomosis has completely failed.
• Opening the anastomosis: after ligating the repaired vessel both cranially and
caudally, cut out the anastomosis, transect it longitudinally opening it as a
book and evaluate the internal aspects of the sutures underneath the operating
microscope.
[ back to top ]
Arterial end-to-side anastomosis
Although end-to-side microsurgical anastomosis is technically more challenging than the end-to-end anastomosis, its importance is undeniable in case of free flap transfers (Godina 1979). In spite of the greater number of delicate maneuvers (such as arteriotomy), the end-to-side anastomosis is often the most suitable solution. It represents a solution for the discrepancies in the vessel diameters and, additionally, it does not interrupt the distal blood flow (Nam 1978).
Graft preparation
Carotid or femoral arteries are both suitable. Harvest the longest possible segment of arterial graft by caudal and cranial ligation.
Dissection of the recipient vessel
Prepare a 2.5 cm segment of the abdominal aorta as desribed above, and after placing a background material, place 2 clamps on it. Bring the harvested graft into the operating field and place it in a C-shaped position along the aorta, anticipating the future arteriotomy sites. Then remove the adventitia carefully over an area twice the size of the future arteriotomy.
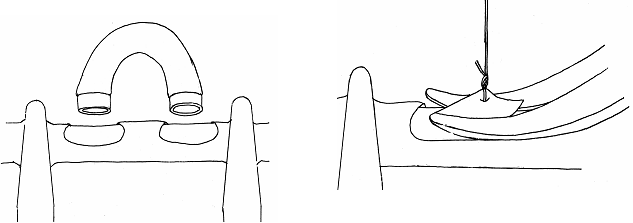 |
| The donor and recipient vessels (on the left), arteriotomy (on the right). |
[
back to top
]
The
arteriotomy
Place a
stitch into the area of the future excised vessel part and lift it up. Next lift
up the vessel wall while, cutting out an ellipse-shaped piece with a single move
with a curved pair of scissors. This excised area can further be enlarged when
necessary, while on small-caliber arteries (femoral, carotid) a simple
longitudinal incision can be also satisfactory. This incision can be enlarged
with a pair of forceps.
After
flushing the lumen of the aorta, make sure that the edges of the arteriotomy are
neatly cut and free of adventitia. The length of the arteriotomy must be one and
a half times the diameter of the vessel that will provide the terminal end of
the anastomosis, so that after the suture it will have a trumpet-shaped form.
[
back to top
]
Anastomosis with interrupted sutures
• Put one end of the graft near the
arteriotomy.
• First place the corner knot: by
stitching into the graft from the outside towards the inside and the artery from
the inside towards the outside (this causes eversion of the vessel wall and
knots will be placed outside the vessel) and then place the second corner knot
at 180° angle from the first one.
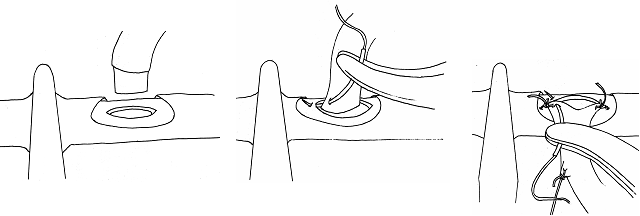 |
| Approximation of the donor segment (left), the first stitch (middle) and suture of the posterior wall (right). |
• When suturing the posterior wall of
the anastomosis, start the stitches at the corners ending up at the center of
the anastomosis. Always enter the graft first and come out through the aorta.
This requires a back-hand approach. Usually 3-4 stitches are necessary. The
position of threads at the edges is the most important: those must be placed as
near as possible to the corner knots.
• At the posterior wall, one should
penetrate the vessel wall radially to the center of the arteriotomy and never
perpendicular to the vessel.
• If the distance between two
adjoining sutures is not equal, it causes bleeding of the anastomotis, which is
more persistent than in case of an end-to-end anastomosis.
• It is often useful to place all the
central stitches first and knot later.
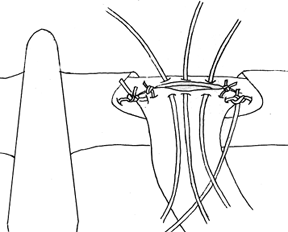 |
| The "insert sutures first, tie later" principle (Tark 1989) |
• Turn over the graft, exposing the
anterior wall. Inspect the interior of the anastomosis and check to make sure
that the sutures were placed correctly. If needed, remove and replace any and
all sutures that have been incorrectly done. If everything is going well, suture
the anterior wall of the anastomosis in the same manner.
• When suturing the second graft, you
will need to place the first corner knot inside the angle between the graft and
the aorta, at the so-called "heel" of the anastomosis. Continue placing the
second corner knot at the "toe" of the anastomosis and then suture the
anastomosis as specified previously.
• Remove both microclamps. Contrary
to the situation of end-to-end anastomosis, if bleeding is significant, it will
persist. Only replacement can solve this problem. If we place a clamp on the
aorta inside the loop of the bypass, we can force the blood flow through the
graft.
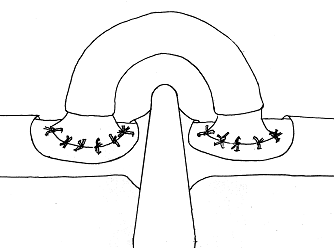 |
When placing a clamp on the aorta inside the loop of the bypass, the blood flow through the graft can forced. |
[ back to top ]
Carotid-to-carotid anastomosis
• Prepare both carotid arteries
caudally as far as possible and cranially, up to the bifurcation and ligate one
of them (this will be the graft). Place a microclamp as far caudally as possible
of the same vessel and section and irrigate it the immediately.
• Dilate the free end and remove the
adventitia. Bring the donor, sectioned carotid over the trachea, making sure
that it reaches the contralateral recicient artery without tension, and estimate
the future site of the arteriotomy.
• Remove a portion of the adventitia
from the recipient vessel, clamp it cranialy and perform a longitudinal
arteriotomy. The length of the incision should be about one and a half times the
diameter of the donor carotid at its end, after you have dilated it.
• Place the first corner knot at the
"heel" of the anastomosis, that is at the caudal angle of the arteriotomy.
Stitch with the needle from the outside towards the inside of the donor carotid
and from the inside to the outside of the recipient carotid.
• We can start with either the
posterior (Harris 1981) or the anterior wall (Ackland 1989, Yonekawa
1999). Remove the microclamps in the following order: first the cranial one
on the receptor artery and after that the caudal one on the same artery. The
last microclamp should be removed from the transposed donor artery.
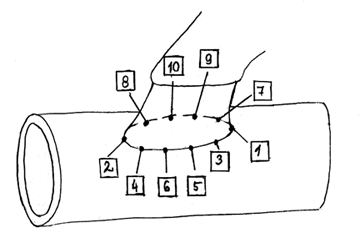 |
Possible order of the stitches in case of end-to-side anastomosis (when we start with suturing the posterior wall). It is a general rule that stitches should be placed starting from to corner toward the center of the anastomosis. |
[ back to top ]
Femoral arterio-venous fistula
This is one
of the most difficult models of end-to-side anastomosis. Since these
vessels are considerably small and their walls are thin, one should try it after
being familiar with other types of anastomoses. As
desribed above, the femoral vessels should be dissected as distally from the
inguinal ligament as possible reaching the difurcation. Ligate both muscle and
epigastric branches. Because the adventitia of the vein is extremely thin and it
is positioned primarily around two longitudinal lymphatic vessels, the use of
moisturized small cotton swabs is recommended.
• After placing a background material
underneath the vessels, ligate the femoral artery as caudally as possible and
place a vascular clamp cranially.
• Cut the artery, irrigate the
segment, dilate its end and remove the adventitia. Position the artery so that
it makes a right angle with the vein, while preventing any tension or torsion.
You can now approximate the place for the venotomy.
• Place two clamps on the vein and
perform the venotomy (stitcs into the wall of the vein where it will be cut and
lift it up gently) and cut out a narrow strip with the length of 1.5 times the
diameter of the artery.
• Beware that the walls of the vein
are extremely thin and transparent and they collapse easily. Wash out the vein
lumen until there is no trace of blood in it, and leave some saline solution in
the operating field. This will make the walls of the vein float in liquid, they
will be easier to identify and less likely to collapse.
• As usual, place the first corner
knot cranially, at the "heel" of the anastomosis, and then the second one, at
its "toe." Suture posterior then the anterior wall paying special attention to
the venous wall that should be well exposed at each passing of the needle. Avoid
involvement of the posterior wall into the stitches. If we include too much
venous wall in the suture loop, this will inevitably lead to a stenotic
anastomosis.
• Remove the clamps in the following
order: first the cranial clamp then the caudal one on the vein, and evetually
the arterial one.
• The first sign that the anastomosis is working is the appearance of pulsing,
red arterial blood in the segment of the vein close to the anastomosis;
caudally, through the transparent venous wall you will see the venous blood
mixing with the arterial blood. Lift up the vein cranially to the anastomosis
until it collapses and see how its lumen fills up rhythmically, with every
pulsation.
[ back to top ]
End-to-side anastomosis with continuous suture
End-to-side anastomosis
with well-executed continuous suture can be as safe as the one with interrupted
sutures. Additional benefit is reduced time because knots are not tied, thread
ends need not to be cut, instruments are not changed between hands. It is
important to use a relatively shorter thread (3-5 cm) to decrease the distress
induced by the longer passage of the thread through the vessel wall.
• This technique can be applied in any end-to-side model where we dissected the
vessels as detailed above.
• Place the first corner knot at the heel of the anastomosis. Tie the knot
leaving the short end somewhat longer so that you will be able to use it later
for tying another knot. Do not cut the needle from the thread, leave it attached.
• Take a second thread and suture the toe of the anastomosis at 180° angle from
the first corner knot. Leave both ends of the thread longer and then perform
continuous stitches. At the first passage of the needle, be assured that you are
as close to the corner knot as possible. The safest direction is from the heel
towards the toe.
• As you advance, leave the loops of the suture loose: otherwise you will not be
able to properly visualize the edges of the vessels.
• A special approach is performing a continuous suture on the posterior wall
without rotating it while the intimal surface is facing us (Hou 1987).
• Tightening in two steps: first tighten each loop, starting at the heel, and
then pick up the end of the corner knot and the end of the long thread,
tractioning until the continuous thread is almost completely tightened. Next,
tie up the long end with one of the threads from the corner knot placed at the
toe of the anastomosis. You should be very careful: at this point you could
cause stricture and stenosis of the anastomosis.
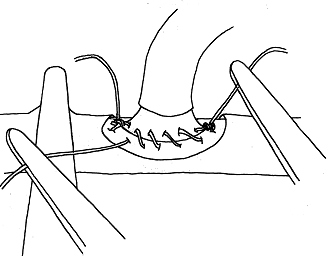 |
Tightening up the loop after continuous suture |
[ back to top ]
Anastomosis technique for peripheral nerves
Background
In
general, microsurgical exposure and suturing skills should first be honed in the
training laboratory, using models with gradually increasing levels of
difficulty. Although the peripheral nerve anastomosis is seemingly simple when
compared to the more challenging microvascular repairs, it should not be
dismissed lightly as it involves specific challenges and particular tricks.
Anastomotic techniques can be practiced on
rat’s sciatic and femoral nerves. The sciatic nerve is the larger of the two and
perhaps a more realistic model. The following basic principles should be
observed when performing microsurgical repair of a nerve:
• avoid tension and axis
rotation of a nerve;
• resect ends sparingly;
• join the ends in the correct
alignment and treat the nerve’s vessels gently.
[ back to top ]
Access to the sciatic nerve
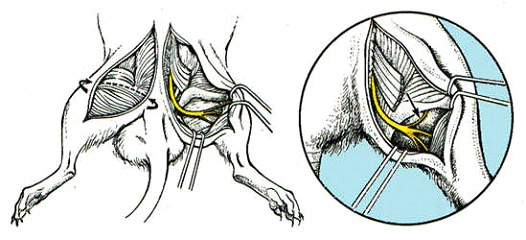 |
|
The nerve should be exposed and cut with a sharp scalpel to avoid crushing injury to and mangling of the axons. It is recommended that a thin blue rubber dam (background) be placed beneath the nerve. The ends are then irrigated and debris carefully trimmed off. |
[ back to top ]
Trimming the axons
In a healthy nerve the axons are under pressure, and proximally a mushrooming effect will occur as the axons extrude from their nerve sheaths. If the proximal and distal nerve ends were anastomosed in this condition many of the axons would grow erratically and neuroma formation would result.
The protruding exoplasma must be trimmed off to create a straighter path for the regenerating axons. This excision should be performed on both ends of the nerve to the extent that short empty sleeves of nerve sheaths remain, resembling a vein. In case of small diameter nerves like the sciatic and femoral nerve in rats, this exercise is more similar to the human fascicular (perineural) nerve repair than to the epineural approximation.
[ back to top ]
Epineural approximation
The first stitch
These stitches involve 8-0 or 9-0 sutures,
and are placed under approximately 5x magnification using the operating
microscope.
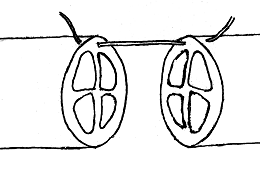
The needle is driven from outside to inside through the epineurium, 1 mm from the cut ends of the nerve in a perpendicular fashion. Note that the needle should penetrate only the epineurium, not the axons. The needle is then driven into the epineurium on the opposite end of the nerve, from inside to outside. The knot is tied with leaving tails approximately 2 cm in length.
Second stitch
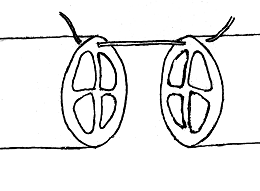
The second stitch is placed in the same
manner, 180° from the first stitch.
 |
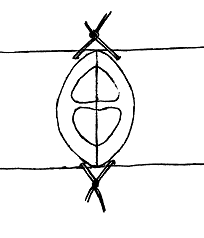 |
If the bundles are of distinct shapes, then aligning them and creating a match should provide satisfactory results.
Subsequent stitches
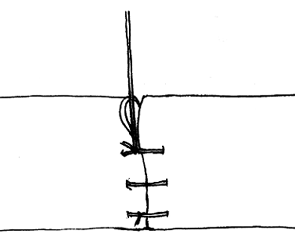
The 1-3 additional sutures can be placed in between the first two stitches on the anterior surface. Using the tails of first and second stitches, the nerve can be rotated 180° and another 1-3 sutures can be placed on the posterior surface. The nerve is then rotated back and the long stay sutures are cut.
Evaluation
The completed anastomosis should not be
under any tension whatsoever. Enough stitches should be placed to eliminate
excessive epineurial gaps. There should be no protruding axons found between
stitches.
[ back to top ]
Perineural suture
 |
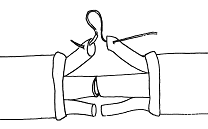 |
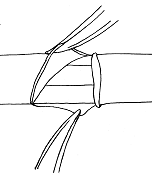
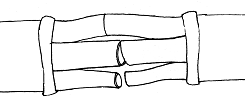
In preparation for a perineural anastomosis, 5-7 mm of epineurium should be resected from both proximal and distal nerve ends. The nerve bundle is then divided by blunt dissection. Each group of bundles are sutured by their perineurium using 2-3 stitches of 10-0 suture under 5-10x magnification. The nerve does not need to be rotated 180° as in the epineurial closure.
 |
 |
Reconstruction should start from the most distant and deeply located bundles, approximating each of the bundles individually.
[ back to top ]
Interposed/jump graft
If the
nerve is to be repaired involves a gap, and it cannot be mobilized so that the
repair can be performed tension free, then the only viable solution is either a
jump graft or an interposed graft.
The jump
graft is applicable if the missing segment does not exceed a few millimeters. It
is accomplished using a sleeve of autogenous tissue or synthetic tubing inserted
between the proximal and distal ends. This sleeve will prevent neural tissues
from migrating randomly between the regenerating nerve ends, thus providing a
clear re-growth and distal migration following Valerian regeneration.
An
autogenous (interposed) graft involves a suitable piece of peripheral nerve that
is fitted between the two ends, filling in the missing length. It is sutured in
place, either in with a epineural or perineural fashion, and will provide a
scaffold for the regenerating nerve fibers.