 |
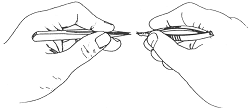
Hold the instruments as a pen (Acland 1989). |
|
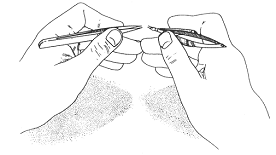 |
If we do not have a chance to support the forarms properly, touching middle fingers with each other improves comfort and stability (Acland 1989). |
Practicals
Position at the operative microscope
Adjusting the microscope
Hand and tool positioning in microsurgery
Exercises with basic techniques
Scraping
letters off a paper
Lacing a thread of a
gauze net
Stitching into a
rubber pad
Knotting techniques
Two-handed
knotting technique
One-handed
knotting technique
End-to-end anastomosis on 1.0-1.2 mm diameter vessels ex
vivo
Preparation
The
technique of the stitching and knotting (demonstration of the “3
o’clock-stitch”)
The
order of the stitches on a vessel
The
steps of the stitches at the dorsal wall
[ back to top ]
Practicals
Position at the operative microscope
Training in a laboratory with an
operating microscope often takes long hours of concentrated work. This task is
impossible to accomplish unless the surgeon has a comfortable and perfectly
balanced position.
Position of the legs
One should remove every object from the way of the
legs on the ground which can disturb convenience. It is also important to have
enough place for the knees, hence sitting at a table with drawers is not always
suitable.
The way of sitting
It determines two very important issues. On one
hand, it affects the ability of manipulation, on the other hand it affects how
we see through the microscope. We can only work without hand tremor if both
forearms are resting on the table (Yasargil 1975). One should not achieve
this immobility by leaning on the elbows, as it quickly leads to fatigue and
tremor of the hands. Turn the light source on, focus on the filed and
instruments held in both hands into the middle of the field trying different
magnifications. The final adjustment is provided by the conformity of body
position and microscope adjustments. After a few occasions, we just briefly and
routinely perform these procedures.
[ back to top ]
Adjusting the microscope
1. Position
the eyepieces at 0 diopter.
2. Adjust
the fine focus.
3. Set
the interpupillary distance.
4. Choose
the lowest magnification and focus on the spot that you previously marked by
using the coarse focus.
5. Choose
the highest magnification and adjust the fine focus also for this magnification.
The reason for starting the fine focusing at the highest magnification is that
the microscope will be focused in the smallest depth of the field, thus allowing
a perfect focus at all magnifications.
6. Switch
to the lowest magnification without modifying the focus, and set the eyepieces
to the lowest possible diopter. Adjust the diopters separately for each eye by
rotating the lens of the eyepiece clockwise.
Advices
· The
operating microscope is a complex, expensive and delicate instrument. When
adjusting the knobs use only your index finger and thumb so that you will not
over-tighten the screw mechanism.
· When
turning the light source on or off, make sure that the light intensity is set to
minimum. By doing so the life of the light bulb will be prolonged by almost 50%.
· While
working, adjust the light to the lowest comfortable level. This protects your
eyes from exhaustion.
[ back to top ]
Hand and tool positioning in microsurgery
Appropriate position of the hands and tools are very important in microsurgery. Please note that only the fingers are allowed to move during work and the arm shoulders rest on a solid surface. This way we can cancel unnecessary movements. The instruments are held like we hold the pen using three fingers, the thumb, the index and the middle fingers. The elbows, the wrists and the ulnar sides of the forearms should lie on the table. The arms should include a 60 degree angle with each other, so the arms get into a slightly supined position.
 |
Hold the instruments as a pen (Acland 1989). |
|
 |
If we do not have a chance to support the forarms properly, touching middle fingers with each other improves comfort and stability (Acland 1989). |
[ back to top ]
Exercises with basic techniques
Scraping letters off a paper
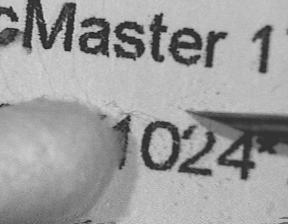 |
During microsurgery, the eye-hand coordination can be practiced and well improved by scraping off printed letters from a sheet of paper using an approx. 20 G needle under the microscope. First we practice how to bring the tool into the microscopic field, then using the tip of the needle, we slowly remove separate letters. With small, horizontal movements we sweep off the removed dye spots using a cotton tip applicator held in the left hand. Use low amplitude movements and high frequency. Speed is unimportant! Avoid puncturing of the paper. The goal is to remove the letter leaving a macroscopically invisible spot behind. |
[ back to top ]
Lacing a thread of a gauze net
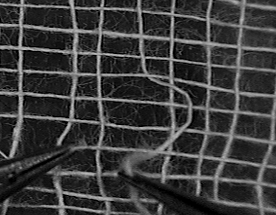 |
Using two forceps, we remove a vertical thread from a gauze dressing. Next we put it back into its original location in the net. Pay attention, you should use both hands equally for grabbing the thread. Grab the thread as many times as possible. The aim is to achieve a state where the previously removed vertical thread is indistinguishable from the rest of the net. |
[ back to top ]
Stitching into a rubber pad
It is particularly important to practice the stitching and knotting in microsurgery. We use 10/0-7/0 atraumatic needles which are permanently attached to a fine monofilament thread. The cross section of the needle is somewhat flat so it cannot turn around along its axis when held in the needle holder. We grab the needle closed to the thread (at 1/3 of the needle). At the beginning even grabbing of the needle represents a problem. The recommended technique is shown here:
|
|
|
|
Holding the thread in the left hand, lay the greater curvature of needle on the surface a way it gets into position where it is suitable to grab it with and instrument held in the right hand (Acland 1989).
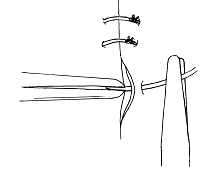 |
For a right-handed person the steps are as follows: the needle is held in the forceps in the right hand, the forceps in the left hand is put under the incision (to expose the wound on the right side). Never grab the edge of the structure to be sutured with the forceps. The axis of the needle should be held perpendicularly to the surface to be sutured. The distance from the edge should be approx. two times the diameter of the needle (Acland 1989). | |
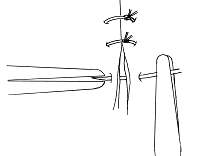 |
On the left side: Let us make the tip of the needle get out exactly in line with the stitch on the right side. (Acland 1989). | |
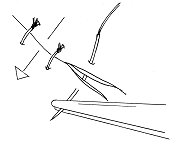 |
When the tip of the needle is visible on the left side, we grab it with the left forceps and pull the needle out. Be careful and do not disconnect the thread from the needle. Let us try to avoid surface friction by retracting with the left forceps when the needle is pulled through the rubber. (Acland 1989). | |
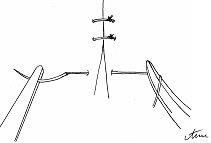 |
When we pull the thread through counteract the friction by retracting with a forcep held int he right hand (Acland 1989). |
[ back to top ]
Knotting techniques
Microsurgical knotting evolves the simultaneous use of two instruments, similarly to the laparoscopic approach. In the clinical practice, two major methods of tying knots are applied: the one-handed and the two-handed versions. The one-handed version resembles the method used in macroscopic instrument-aided knotting procedures, because the long part of the thread is held always in the same hand, whereby the thread is passed into the other hand during the two-handed procedure.
[ back to top ]
Two-handed knotting
A.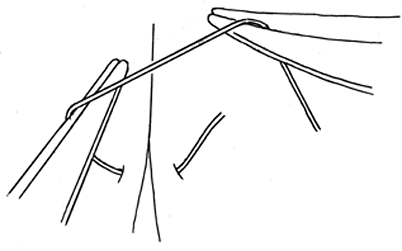 |
B.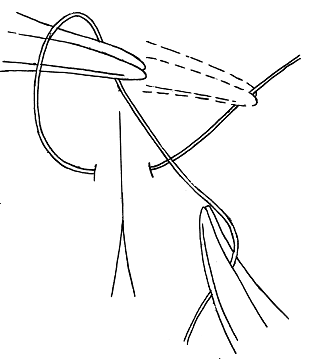 |
C.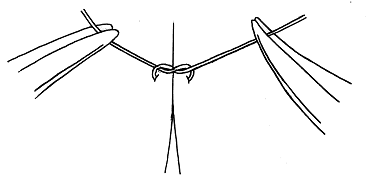 |
D.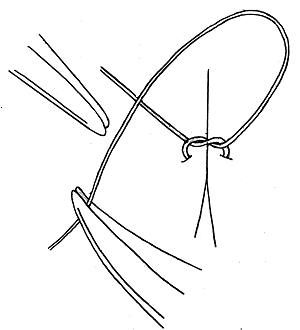 |
E.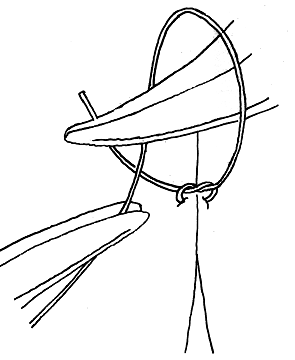 |
F.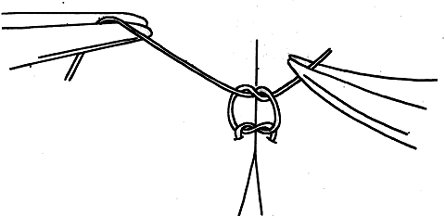 |
The first knot
Grab
the long thread with the right needle holder at a distance which can be easily
looped around the tip of the left forceps (direction: towards the “short end”,
distance: 3 times the length of the “short end”) (A). Reach and pull the
“short end” through the loop with the left forceps (meanwhile do not let the
loop slip off) (B). Pull only the “long end” while firmly holding the
“short end”, and tighten the knot (C).
Attention
1.
When the knot is tightened, the edges of the rubber
should only touch each other - do not overlap! In order to achieve this, the distance of the stitch from the edge should not be large and the knot must not
be very much tightened.
2.
Do not pull the “short end”, pull only the “long end”
otherwise the knot looses its ideal structure.
The
second half of the knot
Move
the”long thread” to the side of the short end (D), grab the “long end”
now with the left hand (distance: 3 times the length of the “sort end”) (E)
and wrap it around the right forceps (direction: opposite to the “short end”)
than grab the “short end” with the right forceps and pull it through the loop (F),
and tighten the knot. Eventually, cut both the “short and long” ends approx. 3
mm long.
[ back to top ]
One-handed knotting technique
|
A. |
B.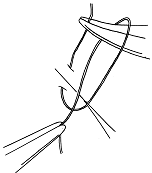 |
C.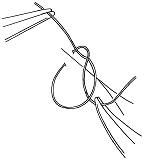 |
D.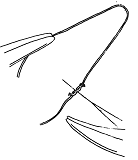 |
E.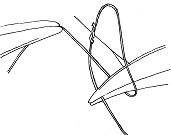 |
F.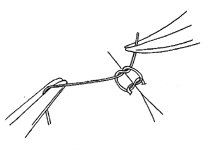 |
We should
distinguish the two ends of the thread as “long end” (to which the needle is
connected) and “short end” (which resides on the right side after the
stitching).
We grab the long thread with the left forceps (A) at a distance which can
be easily looped around the tip of the needle holder held in the right hand
(direction: towards the “short end”, distance: 3 times the length of the “short
end”). This way a loop is created around the tip of the instrument held in the
right hand (B-C). We grab the “short end” with the right instrument and
move it to the opposite side (D-E).
The thread resides in the left forceps, and looping the long thread in the
direction of the short end we create a second loop (G-I). By moving the
short end to the other side we tighten the loop. This square knot is created
similar to that of used in the macrosurgery.
Surgeons’ knot
If the first loop is
doubled, a surgeons’ knot is created which is less likely to get loose during
the second knot is performed.
Attention
The knot is not
twisting/ turning aside (stays a real square knot) if the long thread is pulled
when the knot is tightened.
[ back to top ]
End-to-end anastomosis on 1.0-1.2 mm diameter vessels ex vivo
Preparation
• The prepared vessel is first placed
on a moistened gauze sheet. We keep it always wet in order to prevent drying out
of the vessel wall.
• The isolated vessel should be
clamped with two clips at a set and stable distance and cut completely trough
perpendicularly to its axis.
• The lumen should be rinsed in both
directions with a solution containing high concentration of heparin.
• The adventitia (a thin, fiber-rich
layer on the surface) should be removed in a few millimeter distances from the
edges (using forceps and scissors) (Eisenhardt 1980).
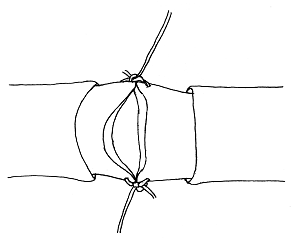 |
Positioning Under both in vitro and in vivo situations 8 stitches are used to suture the edges. The upper pole will be defined as “12 o’clock”, and the lower as “6 o’clock”. |
[ back to top
]
The
technique of the stitching and knotting (demonstration of the “3
o’clock-stitch”)
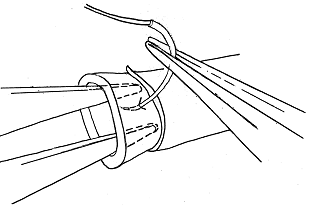 |
First we expose the right side of the vessel with the left forceps. We stitch into the right side of the vessel with the needle held in the right forceps (distance: two times the diameter of the needle) and we exit the vessel wall reaching the lumen. We leave an approx. 1 cm long “short end”. |
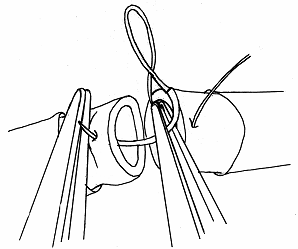 |
When stitching the left side, grab the needle with a needle holder held in the right hand, and stitch from the lumen toward the adventitia in this case. Knotting is performed according to the instructions detailed above (Yonekawa 1999). |
[ back to top
]
The
order of the stitches on a vessel
Frontal
surface:
(1) stitch at „12 o’clock”,
(2) stitch at „6 o’clock”,
(3) we place a silastic cannula into the lumen
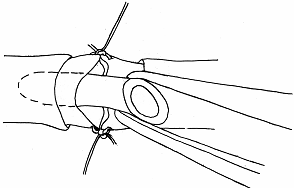 |
(3) The cannula placed into the lumen helps you to avoid the accidental stitching of the dorsal wall (Man 1962, Yasargil 1967). |
(4) stitch at „3 o’clock”,
(5) stitch at “1.5 o’clock”,
(6) stitch at „4.5 o’clock”,
Dorsal
surface:
(7) stitch at 1.5 o’clock”,
(8) continuous suture which consists of 2 steps:
stitch at „3 o’clock”,
stitch at „4.5 o’clock”,
(9) removal of the silastic cannula, knotting.
[ back to top
]
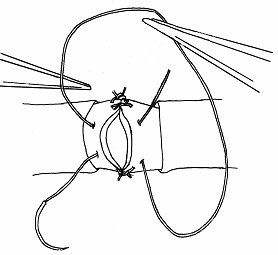
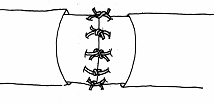
The
steps of the stitches at the dorsal wall
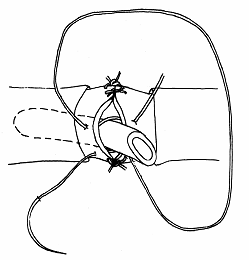 |
 |
 |
| (7-8) | (8) | (9) |
The first stitch is placed at the
upper 1/3 (7. step), which is followed by a regular knot. At the last two
stitches, we apply a continuous suture (8), this enables us to remove the
silastic cannula without the necessity of putting in further stitches. First we
knot the upper loop, than we cut it and we finish with the lower loop.
We can check the tightness of the
stitches by careful pulling of the vessel. By flushing the lumen, we can make
sure the water-tightness of the anastomosis in vitro. To this end, we
insert a longer piece of the afore-mentioned silastic cannula into the lumen and
tie it to the vessel. We flush the system with a saline solution from a syringe
and check if the solution is leaking. If the saline is dripping only from the
other end of the vessel, it shows that the vessel permeable and the stitches are
tight. Under in vivo conditions, we always have some leakage among the
stitches (owing to the high intraluminal pressure in the arterioles), which is
clotted in a few minutes due to normal coagulation processes. A fibrotic tissue
formation will later develop, and after its resorption, the lumen will stay
fully permeable.
We have to take care about the
following factors during microvascular anastomosis preparation:
• The
adventitia should be carefully removed. Adventitia entering the reconstructed
vessel lumen causes microtrombus formation. If the stitch is placed into the
adventitia, the knot splits easily.
• If the
stitch is placed far from the edge of the vessel, or if the knot is very much
tightened, the vessel edges overlap which reduce the lumen of the vessel.
• Let us
not stitch too deep, because we may include the dorsal wall into the stitch.
This can also be avoided when the needle is grabbed not very far from its tip.
• It is
characteristic feature of the microsurgical stitches that those should be placed
faultlessly (to the right spot) for the first time, because repeated stitches
make more holes and deteriorate the structure of the microvessel.