Advanced microsurgery 1.
Laboratory exercises
In vivo procedures,
preparation of the rat
Preparation of the abdominal aorta
Preparation of the a. carotis
communis
Preparation of the femoral artery
Preparation of the femoral vein
Problems and trouble shooting during
preparation
Using the microapproximator
In vivo procedures,
preparation of the rat
The most commonly used means of
end-to-end models for arterial anastomosis are that of the abdominal aorta,
carotid and femoral arteries. The ideal animals for microsurgery exercises are
rats weighting 250-350 g. After the anesthesia, the abdomen, the ventral side of
the neck, and the internal sides of the inferior limbs should be shaved. After
placing the animal on its back we immobilize the limbs with bandage stripes.
[ back to top
]
Preparation of the abdominal aorta
Features: diameter approx. 1.5 mm,
length approx. 3 cm, its preparation requires ligaton and cutting of vessels.
Anatomy
The abdominal aorta lies between
the diaphragm and the aortic bifurcation into the 2 iliac arteries, stretching
over a length of approximately 3 cm. It is positioned along the spine, slightly
posterior to the inferior vena cava. The left renal vein crosses it. Among the
aortic branches, the left and right iliolumbar arteries must also be mentioned
because they need to be dissected and ligated during the preparation of the
vessel.
Macrodissection
Incise the skin with scissors,
starting at the pubis and ending at the xiphoid process. We open the peritoneal
cavity in order to avoid unnecessary bleeding from the muscular wall. Identify
the linea alba and use it as a landmark to in order to avoid unnecessary
bleeding from the muscular wall. Retract the wound using 2 paper clips and
exteriorize the intestinal mass to the right of the rat, folding it in
moisturized gauze. Tear the posterior peritoneum with 2 moisturized cotton swabs
by gentle transverse movements, thus exposing the aorta (between the renal and
iliac arteries) and the inferior vena cava.
Microdissection
Set your microscope over the
operating field and adjust it to a medium magnification. Using 2 microvascular
forceps, free the aorta completely from the fatty tissue surrounding it and
dissect the lateral iliolumbar branches. If we want to achieve a longer section,
we can ligate the renal vessels. Then we separate the aorta from the vena cava
carefully, because the wall of the vena cava is extremely thin and fragile. We
pick up the adventitia of the aorta with one of your forceps while creating a
space between the 2 vessels with the other forceps and using gentle movements
with the other forceps tip, we remove the surrounding connective tissue.
Attention
When picking up the vessel, hold it
only by its adventitia, because picking up the vessel in its complete thickness
produces traumatic lesions of the intima and create the potential for thrombosis
or perforation. The most delicate dissection part is at the level of the
arterial iliolumbar branches, which are strongly bound to the wall of the vena
cava. Keep your operating field clean at all time. The unavoidable bleeding that
occurs during dissection can be controlled by gentle compression with cotton
swabs, lasting about 3 minutes.
[
back to top
]
Preparation of the a. carotis
communis
Features: diameter approx. 1.0 mm,
length approx. 2 cm, no branches to be ligated.
Anatomy
Leaving the thorax, each
carotid artery lies parallel to the trachea until reaching the thyroid gland
where it divides into the external and the internal branches.
Macrodissection
After making
a skin incision between the mandible and the
sternum, we find the vessel medially sternomastoid muscle and place a retractor
on each side of the neck.
Microdissection
Identify and separate the vagus
with forceps under the microscope, and free the artery from the surrounding
connective tissue in about 2 cm of its length. Care should be taken to injure
neither the vagus nor the internal jugular vein.
|
 |
|
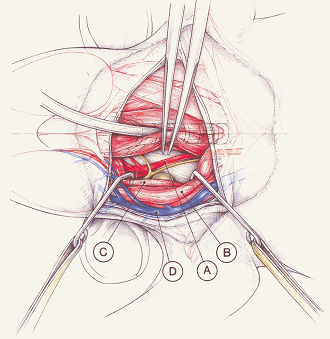
This graphic
(sec. Yonekawa 1999) shows the rigth carotid artery (A), the neighboring
vagus (yellow), which can be visualized be exposing the sternocleidomastoid (B)
and omohyoid muscles (C). The external jugular vein (D) can be found at the
lateral side of the sternocleidomastoid muscle. |
[ back to top
]
Preparation of the femoral artery
Features: diameter approx. 0.7-1.0
mm, length approx. 1.5 cm.
Anatomy
The femoral artery continues the
iliac artery and extends from the inguinal ligament to its final ramifications
(descending genicular, saphenous, and popliteal arteries). A unique vein
accompanies the artery, and both of the vessel are sheltered inside a common
perivascular sheath.
Macrodissection
After making a 3 cm-long oblique
skin incision, we expose the field by using a retractor side-wise.
Microdissection
Using a higher magnification, we
remove the fine layer of connective tissue that covers the tissues with 2 cotton
swabs until the femoral bundle appears wrapped in the vascular sheath. We create
an opening in the sheath with 2 forceps using blunt preparation and gently (the
vein wall is extremely thin) separate the femoral artery from the vein by
handling only the adventitia of the artery. Then we isolate the muscular branch
over a length of 1-2 mm and cut it after ligation. We make sure that the femoral
artery is completely free on its course between the inguinal ligament and the
origin of the superficial epigastric branch.
During the dissection of the
femoral artery spasm often occur (because of the trauma caused by the
dissection, the contact with fresh blood, and dropping of wound temperature)
which can be relieved by irrigating the wound with a warm solution of lidocaine
1 % for a minimum of 3 minutes (Beekman 1988).
[ back to top
]
Preparation of the femoral vein
Features: diameter approx. 0.7-1.0
mm, length approx. 1.5 cm.
Anatomy
The vein has a bigger diameter than
the artery but its walls are thinner and more fragile. In addition, the blood
flow is lower, and as a result, even minor trauma can easily produce thrombosis.
When we empty the vein of blood, its walls collapse and adhere to each other,
making it difficult to localize the lumen of the vein.
Macrodissection
See that of the femoral artery
Microdissection
Under high magnification, we separate the vein from the femoral artery
carefully prepare the muscular branch over a length of 1-2 mm, and section it
after ligation or bipolar cauterization. At this moment in time you should make
sure that the femoral vein is completely freed from its surrounding tissues,
between the inguinal ligament and the emerging site of the superficial
epigastric branch, and that the vein does not contain any thrombi. When checking
for thrombi you should slide the instrument along the length of the walls of the
vein (thrombi will appear as brown spots). If there are thrombi in the vein, you
should abandon the versel and restart the exercise in the contralateral area.
 |
 |
|
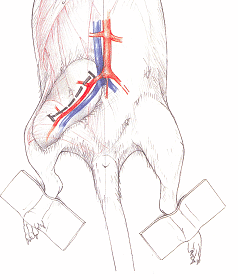
The graphics
show the infrarenal section of the abdominal aorta and the inguinal region with
the femoral vessels and the epigastric branch (left) and the prepared femoral
vessels (left) (Yonekawa 1999, Acland 1989)
|
[
back to top
]
Problems and trouble shooting during preparation
• Work in a clean field with as
little blood present as possible.
• Keep your microscopic image clear
and focused at all times.
• Dissect, retract, and pick up only
in those areas where you have perfect visual control over the active parts of
your instruments.
• Stop if a problem occurs, be it
bleeding or spasm. You should continue the dissection only after the problem has
been solved.
[ back to top
]
Using the microapproximator
Place a
piece of background material underneath the prepared vessel. This will ensure a
clear view of the fine details and prevent you from confusing the surrounding
tissues during suturing. Before placing the microapproximator you should check
to be sure that (1) the vessel is clean and free of any coagulated blood or
tissues, (2) both clamps can be opened easily, and their jaws overlap perfectly,
(3) both clamps move easily on the bar that holds them together.
We pick up
the caudal portion of the artery by its adventitia, lift it and place it within
the open clamp of the approximator. We open the second clamp (the cranial one),
pick up the artery again, and place it between the jaws of the clamp. This was
we produce a supplementary vasodilatation. Make sure that the vessel is not
twisted.
....