 |
 |
|
 |
 |
Advanced microsurgery 3. Clinical microsurgery
Background
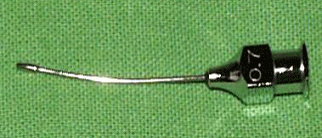
Loupe and microscope
Preoperative preparation
Sterilization, care
Threads, suture materials
Stitches
Replantation
Background
Replantation procedure
Microvascular tissue transplantation
Background
Toe transplantation to hand
Toe transplant
Flaps
[ back to top ]
Background
The
rudimentaries of microsurgical technology emerged centuries ago, but its
evolution and potential for clinical applications developed during much of the
twentieth century. After the groundbreaking advances in suturing and anastomotic
techniques in the early part of the century, the operating microscope was used
clinically by ophthalmologists and otorhinolarygologists. It was in 1960 that
Jules Jacobson, a vascular surgeon, described microsurgical anastomoses in
vessels as small as 1.4 millimeters using a microscope, followed by
reconstructive microsurgery developments. In 1964
Harry Buncke reported the first successful rabbit ear replantation to the
Plastic Surgery Research Council Meeting in Kansas City. This was a
milestone in the development of the field of microsurgery because it was the
first report of an amputated part successfully reattached using blood vessels 1
millimeter in size. This size was considered critical because it approximated
the size of vessels in fingers and major vessels supplying muscles and skin.
Clinical practice eventually followed, beginning with limb replantation, then
extremities, and finally digits. Gynecologist and urologists adapted techniques
from the reconstructive colleagues for microsurgical infertility procedures, all
directed toward refined techniques and improved quality of life.
Current
microsurgical techniques and technologies were developed in the early 1970’s
before commercially available instruments and sutures were accessible for
microvascular and microinfertility surgeries. During this period, the
microsurgery laboratory and standardized training curriculum were developed in
the Buncke laboratory. Surgeons from the U.K., U.S., Australia, Japan, China,
France, Germany produced the largest number of publications but within the next
twenty years reports of microsurgical cases began to emerge from surgeons
worldwide.
In Hungary,
the experimental and clinical work began in the major traumatology centers by
Gulyás, Sántha and Renner in Budapest, by Simonka in Szeged, and by Nyárády in
Pécs. Since then, these centers have continued their activities with ongoing
research, clinical microsurgical cases, and training. Microsurgical techniques
are applied primarily within traumatology - most frequently in replantation,
revascularizations, and tissue transplantation.
These are
also used whenever magnified, precision repair is required on the accessible
(relatively superficial) organs, including the eye, ear, vas deferens, Fallopian
tube, peripheral nerves, etc.
|
|
|
|
|
|
|
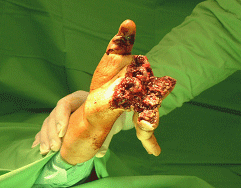
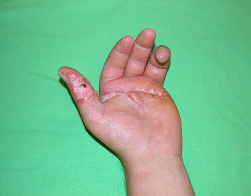
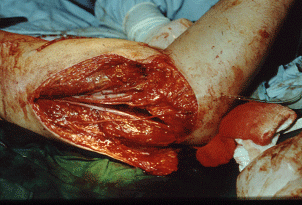
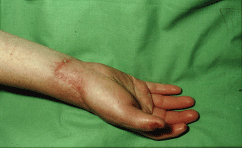
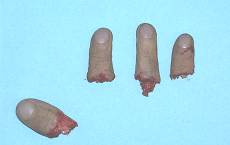
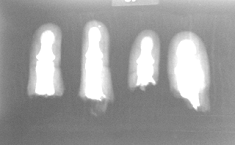
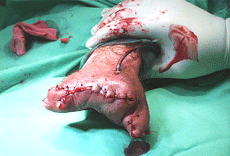
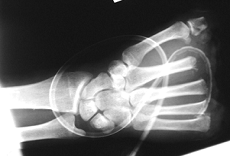
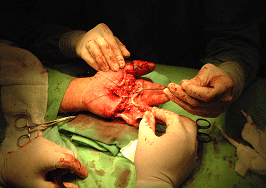
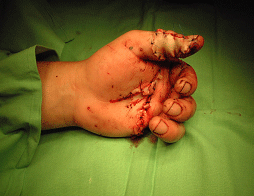
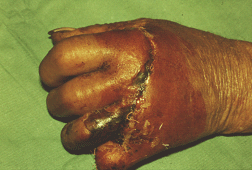
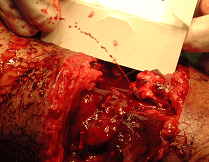
Due to the lack of conditions for microsurgical replantation, the amputated fingers could not be reattached, resulting in a hand incapable of gripping.
[ back to top ]
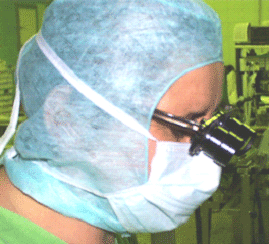
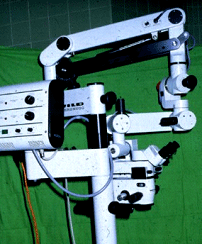
Loupe and microscope
Initially
magnification was achieved by the use of magnifying lenses (loupes); later the
surgical microscope was used. Current operation microscopes may be equipped with
servo-motors to facilitate changing magnifications and adjusting focus, and they
maybe have dual or multiple viewers (when the surgeon and the assistant are
viewing identical image). Recording of still or video images are additional
options.
Operative
microscopes contain their own light-sources, precluding the need for surgery
lamps. On the other hand, if a surgeon using loupes does not have a head-mounted
fiberoptic light source, then traditional surgery lamps are required to provide
illumination. Dehydration of tissues can easily result, and therefore, frequent
irrigation is needed. If adjustable illumination is used with loupes, it is
advisable to adjust the brightness up to the optimal level but not beyond it. To
help increase contrast within the field of observation the background (room)
lightning level should be reduced.
Under the
operation microscope, the most common magnification ranges are 4.7-7.8 X for
dissection and 7.8 – 12.5 X for the anastomosis. Magnification offers the
opportunity for the surgeon to observe human tissue in much greater detail. The
difference between the traditional and the microsurgical preparation techniques
can be substantial - with the aid of magnification, and with proper technical
training, the opportunity to handle tissues in an atraumatic fashion is
available and should not be squandered.
 |
 |
|
|
Degree of magnification: normal view and 4x magnification of a suture |
||
Loupe
magnification and focal length (working distance) is fixed. With the surgical
microscope, the focus is adjustable, and by using interchangeable objective
lenses, the focal length can also be altered. With loupes the surgeon is less
restricted in terms of hand movement; however, he must keep his head absolutely
still to maintain focus. This aspect involves a learning phase, and while loupes
are less expensive and therefore more readily available, it is somewhat more
tiring initially to use them. In addition to requiring the surgeon’s head to be
held still, the lack of direct illumination from a head mounted light source
could also make use of the loupes more challenging than the surgical microscope.
Before using loupes one should ascertain:
• lenses are spotlessness
clean,
• interpupillary distance is
set correctly,
• convergence angles are also
set correctly -so that the surgeon is able to see a single image using both eyes
together, and therefore has depth perception.
The
surgeon’s mask may need to be adjusted to avoid having the lenses fogged during
the procedure.
 |
 |
|
|
Correct placement of the loupes; surgical microscope |
||
Furthermore, the most practical magnification of loupes while still maintaining a comfortable working distance is 3.5 to 4.5x. The higher the magnification, the better the visual detail; but the the field size is smaller. Also, a higher magnification is associated with a closer working distance: e.g. 6x requires the surgeon’s eyes to be less than 15 cm from the tissues. A microscope must be examined before each usage as its settings for the previous surgery may be different than that for the surgery at hand. Furthermore, it is a good practice is to check the functionality of the light-source and the servo-motor before the operation starts. It is also advisable to explain the usage of the loupes and the microscope step by step for the assisting crew prior to the commencement of the case. The requirements of sterilization must also be meticulously adhered to, using the appropriate sterile drapes to cover the surgical microscope.
[ back to top ]
Preoperative preparation
In preparation for surgery, the patient is examined and a careful evaluation is made to determine if further tests are required, e.g., an angiogram or digital subtraction angiography (DSA). Atypical anatomical deviations can be discovered in advance which can help reduce the possibilities for unexpected complications during surgery. Use of a Doppler ultrasound or simple palpation to determine the direction of a neurovascular pedicle can be inadequate and misleading because of the presence of damaged or sclerotic vascular obstructions in trauma patients. For acute or elective microsurgical cases, performing angiography and/or DSA studies preoperatively is strongly recommended. It is further advised that X-ray and DSA images be displayed in operating room for reference during the case.
Patient
positioning
Proper
planning and organization of the surgery and OR staff is a basic tenet. For
example, the position of the patient’s body, location of the operative field,
and placement of the occluding cuff if used, must be considered carefully in
preparation for surgery. Should the need arise to reposition and reinsulate the
patient intraoperatively, and then it is prudent that the surgical team be
advised in advance to facilitate overall efficiency. The surgeon should
participate proactively in the positioning of the patient. In the initial phase
of the operation one should allot time for the adjustment/isolation of the
loupe, light sources, satellite lamps as well.
During elevation of the latissimus dorsi flap, including microvascular dissection of the vascular pedicle, the patient is placed on his side. After the flap is harvested, the patient is then repositioned.
Coordination
Microsurgical interventions can be lengthy procedures, and any amount of wasted
time can result in unnecessary stress for the patient and surgical team alike.
When needed and possible, two or more surgical crews should be coordinated to
work together to alleviate fatigue and improve efficiency; e.g., the preparation
of the donor and recipient areas might proceed simultaneously. In the case of
free flap surgery the original pedicle and flow is left intact up to the moment
the recipient site is fully prepared and ready to receive the graft.
Accordingly, it is advised to prepare the receiving area first.
 |
 |
|
|
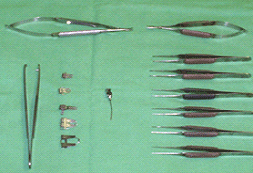
Standard and microsurgical instrumentation, including microscissors |
||
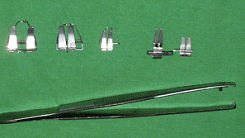
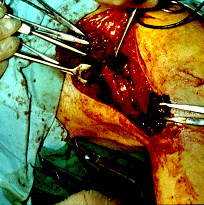
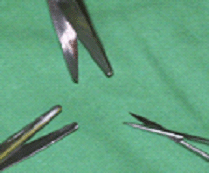
Inspection of the instrumentation prior to surgery is recommended. Besides the traditional dissectors, clips, and scissors it is advisable to organize and inspect the fine instruments used for preparation of the operative site to be assured of their proper performance. When selecting microsurgery instruments they should be prepared according to the relevant phase of the operation. For example, preparation of blood vessels is necessary in all operations; during adventectomy microforceps and microscissor, etc., are needed; for irrigation or flushing the vascular lumen, a blunt-tip, thin-gauge needle or an appropriate-sized cannula, is needed.
|
|
|
|
|
Blunt-tip irrigating needle and various sizes of approximating clamps with applying forceps. |
||
In case of
larger objects the Fogarty catheter may be necessary to secure the outflow line.
To prepare, isolate veins and fine objects, nerve, tendon hooks, are favored,
lacking these we can push aside the prepared objects with fine silicon sticks,
tubes. Do not place on these sticks fine instruments, because due to their thick
wall the instrument can get under strain and buckle. Just the same, instruments
can get deformed due to improper usage, “too strong” grip, thick thread
knotting, dropping, during washing, sterilization. With proper approach called
the “pencil” hold, too strong gripping can be avoided. The palm grip is not
allowed in case of microsurgery. During microsurgery procedures it is advisable
to let hands, forearm to be supported by the table or other fixed item.
In the
instrument armamentum marker and approximator clamps are indispensable; they
excel in temporary blocking of diverse size arteries and veins. In case of large
objects bulldog clamps are used, lacking these, silicon tube underlooping comes
handy. Even if they happen to be actually in our hand, never place clips with
microsurgery forceps. When placing clips many opt for large anatomy forceps, in
that case pay attention, the clip can be harmed, or “jump away”. To place clips
have a pincer with a special bumper, keeping the clip fixed and preventing
excessive pressure. When removing clips, firs free the outflow line, next open
the proximal clamp, let pulse wave on the anastomosis, otherwise excessive
bleeding may occur.
Use of
bipolar forceps is important in microsurgical operations; it is insulated and
its use ensures that the biological effect of electric current affects only the
area between the two forceps tips. Its use should follow proper technique and
safety precautions to avoid inadvertent injury to adjacent tissues, or the main
trunk of the target vessel. A safe alternative to its use, especially if the
surgeon has reservations of its safe application in a given circumstance, then
the employment of ligatures or clips would be advised. Again, the principles
that apply to surgeries in general are relevant to microsurgical cases, with the
following additional points:
• place the clips with a
special pincer and adequately sized league-clips.
• in cases of absorbable
threads, avoid threads marked with “rapid”.
[ back to top ]
Sterilization, care
Damage to microinstruments can be avoided with proper training on their appropriate usage and handling for the surgeon, surgical assistants and support staff. It is especially important for the surgical staff to know how to handle, protect, clean, sterilize and repack microsurgical instruments as this knowledge is crucial in prevent damage. Instrument deformation can only be avoided with due care and attention. It is wrong to let the professional team working in the central sterilization unit to do the washing ahead of sterilization, because somebody completely unfamiliar with the workings of microsurgery tools, cannot be trusted to do his/her work with due care. Best if the washing and packing of instruments is done by our own surgery assistant. When packing, it is appropriate if we have a special box with relevant nook for each tool. Of course these boxes are designed with the tools manufactured by the very manufacturer in mind, they are well-sheltered during transport, but are expensive. If we lack a box like these, then we can protect the tips of instruments with silicone tubes during sterilization, transport and storage. It is a a nuisance when a microsurgery tool is rendered useless by deformation. Reparation of such tools are not always feasible, nevertheless their price have no upper limit.
[ back to top ]
Threads, suture materials
We use
special suture material to reconstruct diverse objects. We classify suture
materials in general by their material components, thread thickness, structure,
and shape of the needle-tip, size, and form. Today only atraumatic threads are
used for microsurgery. In case of very thin threads the manufacturers coat the
surface of the thread with metal, e.g. the needle itself is the stiffened end of
the thread. Due to this technical solution the thread fills completely the
tissue deficit caused by the needle, and prevents prospective postoperative
bleeding.
The length
of the threads varies between 12 and 60 cm; some of them are equipped with
needles on booth ends. Generally we use non-absorbable suturing materials, if
possible the point-tipped, round needle variety, the ideal needle size varies
between 4-8 mm. In case of too small needles, one can not manage to stitch far
enough into the object, in case of too large needles one or several stitch can
easily get through the intima of the posterior wall, thus doubling the lumen and
rendering it too narrow. With due experience one can perfect a suture either
smaller or larger the needle, but it is not always easy. The shape of the needle
usually 1/3 or 1/2 circle, possibly J shaped (the latter is recommended by the
manufacturers for vascular suturing in heart surgery, because this needle helps
evade stitching into the posterior wall). It is important to plan the site of
each stitch. A stitch must not be too tightly made; neither can it be too slack,
because it might trigger technical error.
 |
| Incorrect, slack stitch, may cause bleeding afterwards. |
[ back to top ]
Stitches
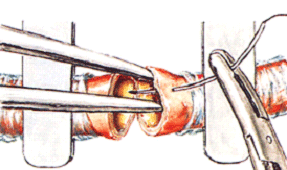
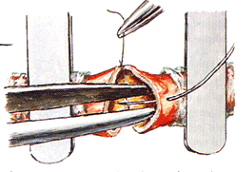
When placing stitches special care must be given to the stitch direction, it should be perpendicular to the longer axis of the object for the sake of ideal compliance. A stitch has only one single ideal spot, to rummage around is unwise, as each puncturing results in a new intima injury. When placing the stitch and during knotting we rather support the thread with the tools instead of gripping it (like with a pincer).
|
|
|
|
|
The correct steps of microsurgery stitch placing; the pincer only serves as support. |
||
In case of
smaller objects we generally employ several, separate knotted stitch, only when
reconstructing larger objects do we employ continuous suture. To facilitate such
a procedure we might employ thread with needles on booth ends.
When
knotting, we employ the apodactylic knotting method, making double loop at the
first “half knot”. At that point it is appropriate to tug the stitch in the
direction of the sliding, because in the opposite direction the sliding motion
is erratic, the knot might even rupture, or get knotted too tensely. When
developing the loops, we can sense certain rigidity in the thread depending on
its material and the thickness - this happens to be a helpful characteristic
when developing a loop with the spinning motion of fingers. Knotting is done
under the microscope, so it is smart to stitch the needle into a spot which is
out of the way of the knotting movements, but still in view, because after the
knotting is completed it is easier to find it and use it for the next stitch.
When knotting one must avoid developing the knot by holding the needle in the
hand as the tool, because the needle can easily come off, and we must ask for a
new thread. The second and further knots must be placed in each case in the
opposite direction, to keep the preceding knot in a tightly strung condition. In
case of arteries we knot with 4 separate loops. We must choose the thickness of
the thread keeping in mind, that the ends of the objects have to be held without
strain, and at the same time, with the fewest possible stitch the scantest
possible foreign material should remain within the object. In general, to suture
a digital artery we choose 8-10/0, to suture digital nerve 6-8/0, to suture
flexor and extensor tendons 4/0, for tendon sheet reconstruction 6-7/0 suture
material. Of course one can revise these figures to suit the size of the
objects. Knowing and possessing the technique is often deceptive: to apply it
requires a lot of practice and acquired skill. It is not enough to own the
microsurgery tools, suturing material and technique; one must be able to use
them in the right moment in the most appropriate manner.
In the
postoperative phase the professional team shall check the patients to alert the
physician, surgeon if necessary. The nurse must be explicitly trained for this
task, as not only the general physiological (pulse, blood pressure, blood,
laboratory data) parameters of the patients must be scrutinized, but also the
successfulness of the microsurgery intervention itself. To this end the most
relevant aspect is the checking of limb color, turgor. In case of a withered
limb loosing its turgor one can presume, that the region with the artery is
suffering from blockage. It is indicated by disappearing pulse or the loss of
capillary signal. Nowadays monitoring the temperature of the limb is feasible by
tele-thermometer, or sensors lying affixed on skin. The incoming signal can be
compared with the same limb on the opposing side, or with previous measurements
made on the very same limb.
In the
initial phase of vein blockage the turgor might rise for several minutes, tissue
pressure can be detected in conjunction with red, lilac discoloring of the limb,
later cyanosis. In this phase pulse-wave is still perceptible, the limb’s
skin-temperature slightly higher. However later on, the fault of the outflow
line causes arterial blocking with all the relevant symptoms, ending with tissue
necrosis. Temporary disturbances of microsurgery interventions can be corrected
with intravenous medication, by giving vein-, plasma-expanders, transfusion, by
optimalizing blood viscosity parameters (approx. 25% hematocrit value, while
preserving the O2 transport capacity), however in case of recurring
or persistent circulation disturbances one must inspect the permeability of
anastomosis, and if necessary embark on an immediate reoperation. To do that,
one must know/check all the parameters of the patient, to make flawless decision
in the right moment.
Finally,
the most important message: microsurgery is not only technique, but a way of
thinking, the constructive adaptation of the achievements of parallel schools of
thinking in practice.
[ back to top ]
Replantation
Background
Replantation is the restoration to their original place of severed limbs, partly
or wholly. If the part of the limb is connected to the body by any kind of
tissue-bridge, but the makeup of this bridge is not sufficient to ensure the
survival of the severed part, then the case is called partial amputation, and
our task is to perform revascularization.
It is an
old aspiration of the medical profession to replant severed body parts, or with
replantation of limbs following mutilations restore the original function. By no
accident became Cosmas and Damian saints, or raked together the legendary mother
of Lemminkäjnen in the Kalevala her son’s maimed body to rebuild it with the
help of magic lotions and spells.
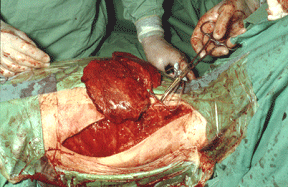
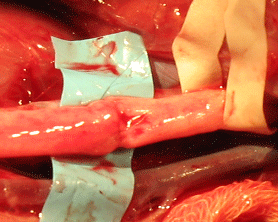
Due to technical advances of the second part of 20th century, and the developments in modern vessel-suturing the reconstruction of delicate objects became feasible. The introduction of microsurgery methods in different fields of the profession started in the sixties. The first experimental efforts came to fruition in the fields of reconstructional and plastic surgery, peripheral nerve-surgery, surgery of the central nervous system and experimental organ transplantation, followed by clinical achievements. The latter mentioned fields have excelled in successful limb replantations, forearm replantation, replantation of severed thumb, planting toe into the hand region, free skin transplants, and replantation of numerous other tissues. Amongst the efforts to reconstruct limb circulation one must mention, owing to their historical significance the following cases. Successful limb replantation: Malt and McKhann (1962), forearm replantation: Chen (1963) and Horn (1964), replantation of severed thumb: Kamatsu and Tamai (1965). In Hungary microsurgery efforts began to bear fruits since 1978, on the experimental field Nyárády, Gulyás, Simonka, Sántha and Renner published research material, the sequence of the names denotes chronology as well. The clinical results from the same authors brought about the first actual results as well between in the period 1972-82. The most important dates are the following: finger by Nyárády in 1979, small limb replantation by Gulyás 1980, upper arm replantation by Nyárády 1982, thumb replantation by Gulyás 1980, toe planted into hand by Simonka 1982, and arm by Nyárády 1982. In Hungary presently in 15 towns and ca. 20 institutions are fully equipped for replantation procedures.
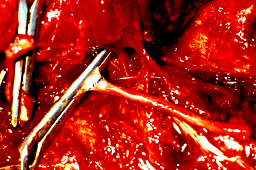
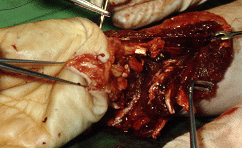
Microsurgery artery suture
[ back to top ]
Replantation procedure
| Prehospitalisation phase: |
Team organization First aid, shaping public opinion Transport, alarm system, Paramedics |
| Hospital phase: | Examination, diagnostics Indication Operation Postoperative treatments. Monitoring Complication averting |
| Rehabilitation phase: | Healing gymnastics, physiotherapy Reconstruction, rehabilitation |
Prehospital phase
The
prehospitalisation phase includes booth organizational and professional tasks.
One of the most difficult undertakings is to establish readiness for
replantation and to train an adequate number of operators. This takes often
years of persistent work. The comprehensive coaching within the framework of
gradual education and resident training is aimed at teaching how to transfer the
patient to the hospital in satisfactory condition; this is essential requirement
of replantation. One of the tasks of the microsurgery unit is this – present
paper is organic part of this effort. The departments of operative techniques
and surgical research have always played pivotal roles in the individual and
group training of skilled specialists.
To
determine the suitability for replantation of the severed body part is the task
of the surgeon of the given team, although providing a chance is the task of
first aid physicians, ambulance crew.
The severed
body-part, as well as the other injuries of the patient must be sterilized, then
sterile bandage must be provided, and as far as it is feasible must be cooled
down to reduce the time of warm ischemia. It is best done with water cooled with
ice-cubes, wherein the body-part is placed in watertight wrap (nylon sack,
plastic box, etc.). Too bad, that several limb replantation has failed due to
inferior transportation. The most frequent errors: body-part placed directly
between ice-cubes; consequently the severed finger is rendered useless. Another
frequent error is placing the body-part into tap water without packaging, in
this case the limb gets macerated, cells die; - no way to perform replantation
successfully. A number of replantation lost chance, because the first aid
personnel left the amputate at the site of the accident, so it arrived to the
hospital only hours later. It is essential, that the severed part must arrive to
the hospital possibly together with the patient. It is also a typical
inadequacy, that the patient gets a ride around the country, instead of landing
directly in the institution offering definitive care.
It is
expedient to restore the limb’s arterial circulation within 6 hours, because in
the period of warm ischemia, as time progresses tissue necrosis expands
significantly. During muscular tissue disintegration myoglobin gets into the
circulation then into the kidneys, causing serious, irreversible glomerular and
tubular changes. This revascularization (reperfusion) syndrome in grave cases
(following late replantation of large limb, mainly legs) can lead to the death
of the patient.
|
|
 |
 |
|
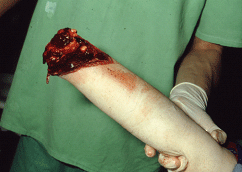
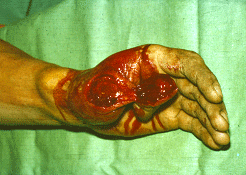
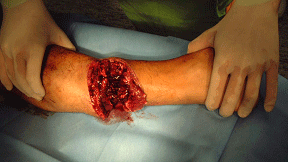
| Replantation following 12 hrs long warm ischemia | |
Hospitalization phase
• Patient examination
• Instrument diagnostics,
X-ray, laboratory
• Considering indication -
contraindication
• Team work – consultation
with anesthesiology
• Knowledge – experience -
decision
• Patient information,
agreement
• Performing the operation,
documentation
• Postoperative monitoring
• Complications watch,
averting, reoperation
• Function – healing
gymnastics – physiotherapy
• Weeks – months - years
• Further reconstructions –
function-enhancing operations
• Post-treatment,
documentation
In the
course of patient examination following the checking in procedure the assisting
team carry out a detailed anamnesis, which have to take account of all the
previous illnesses of the injured person in question, specifically those of the
circulatory organs, illnesses inflicting the heart and the veins
(arteriosclerosis and stenosis of veins of other origins, anomalies, vibration
maleficencies, illnesses of fleboveins and lymphatic veins) paralysises of
central and peripheral origins (plegias, numbness, brain ischemia episodes),
oncological, mental diseases, earlier posttraumatic conditions of the injured
limb, the age of the patient, his/her potential stamina during surgical
intervention.
Instrumental diagnostics offers good help; it is useful to make angiography – if
time and instrumentation allows - besides the traditional means imaging.
Preoperative angiography, DSA caused problems repeatedly, as the contrast
material used can cause serious, lasting vasospasm. Laboratory tests, blood
group classification have vital role here. In case of big limb replantation it
is always required to give blood preparation, besides plasma substitutes and
hemodilution. In case of replantation subjects controlled hemodilution is
expedient of hemorheological reasons. Considering indication – contraindication
requires the most possible experience; in each case one must make individual
decisions. To set up the indications, we list a few factors here:
|
Age Gender Other illnesses General condition Endurance Profession Cooperative inclination |
Shape of the wound Level of amputation Further injuries on the amputatum Anoxaemic time Transport, storage of the limb Expected functionality Cosmetic aspects |
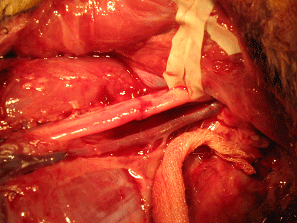
It is a basic consideration, whether the injured is willing to regain his/her lost body-part (in case of failed operations ca. 30% of patients do not aspire to get back the severed part, namely and mainly the resuturing of a long finger). It is essential to correctly assess the compliance of the injured, as next to the operation itself many months of regular gymnastics and physiotherapy must follow. Realizing the functions returned further function-enhancing operations, plastic surgeries, nerve-replacements, muscle, sinew shifts are necessary, as it is likely, that without all the previously mentioned steps the replanted limb might function only as a cosmetic prosthesis. From the indicational point of view one must differentiate the cases depending of the physical level of amputation. The level marking the border on the upper limbs is the height of the wrist, injuries distal from here are called “small limb”, proximal from here “large limb”. This distinction is based on the size of the muscular mass on the limb. In case of large limb the danger of the revascularization syndrome is always substantially bigger; in case of small limb the danger of such postoperative damage is lesser, even after delayed intervention (long lasting warm ischemia).
In case of small limb
Absolute indication: Thumb
Parallel amputation of several long
finger
Relative indication: Young patient
Sharp edged injury
Relatively short warm ischemia
period
 |
 |
|
|
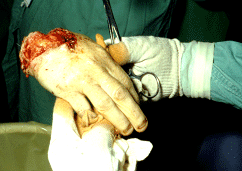
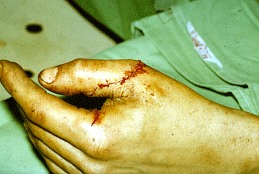
Small limb amputation with sharp edges
on long finger, after replantation |
||
 |
 |
|
In case of large limb
Absolute indication: upper limb
Partial amputation with extensive
destruction
Relative indication: Lower limb
Young patient
Sharp edged injury
Relatively short warm ischemia
period
|
|
|
|
|
|
|
|
|
Lower limb revascularization |
||
|
|
|
|
|
|
|
|
|
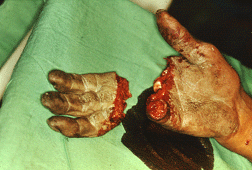
Border area large limb amputation, condition after replantation |
||
Operation scenario
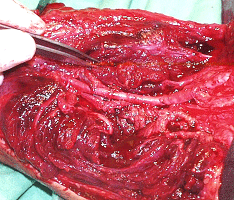
No strict rules apply here, successful replantation speaks for itself. The immediate operational prerequisites might vary the sequence of objects processed, but nevertheless first the stabile support of the limb must come first by reuniting of bones. In the coming steps we can neglect the customary sequence of efforts by observing the angle of the amputation, the warm ischemic period, tissue deficiencies, and case specific peculiarities. The fundamental thing is that the circulation must be carefully restored, if necessary by grafting, in the case of the side with the veins one must strive to adhere to the “one artery – two veins” rule. In the course of circulation restoration the replantation can only be carried out with safely conductive, curl- and strain-free vein-suture. To carry out this task the necessary skill and preparedness must be obtained in the training stage. One can find the vein quicker by resorting to the “reperfused circulation” method, that is to say by examining the limb under circulation. This trick triggers only minimal blood loss, and by letting out the first circulated blood one helps prevent the reperfusion syndrome as well, because the blood saturated by myoglobin does not fuse into the body proper. Further reconstructional efforts on the limb under circulation again are depending on the condition of the patient too; on a resilient patient all aspects of the reconstruction work can be completed during the very first intervention. In case of frail, exsanguinated patient, small child, the anesthesiologist and the surgeon shall mutually agree on the steps to be taken. The sutures of veins must be covered firstly with living skin, if necessary by lobe rotation/turning. Badly chosen, necrotic skin bridges, lobes are hazards carrying the chance of future arrosion bleeding. Below we sum up the expedient sequence.
Small limb
Cutting out the wound
Preparation of tissues on both wound
surfaces
Stabile bone-uniting operation, athwart
shortening osteotomy of the ends (disk-based osteosynthesis)
Suturing one or two feeding arteries
Reconstructing two veins for each
artery
Reconstruction of fascicular nerve
trunks
Suturing sinews, muscles
Closing the skin
 |
 |
|
 |
 |
|
| Replantation steps of large limb.
A. Stabile disk-based osteosynthesis; B. Making of vein anastomosis; C. Suturing nerves, sinews, muscles; D. Closing the skin |
||
Postoperative phase
Monitoring
of the resutured limb and the patient in the postoperative phase is crucial.
Only personnel well versed in the pathophysiology of diverse perils (artery
blockage, vein insufficiency, blood-pressure fluctuations, revascularization
syndrome) and prepared to notice the symptoms correctly and ready to alert the
medical team in good time might attend such patient. During the course of limb
monitoring namely the monitoring of artery side it is simple and expedient to
check the capillary signal, assess turgor, measure skin temperature. Generally
the temperature of replanted limb is higher than that of the opposing one,
because due to microvascular adventectomy carried out during reconstruction no
vegetative nerve regulation exists. In the beginning the artery works with full
diameter, no tightening nerve impulses occur. Due to hemorheological
considerations we do not think the restoration of the patient’s biological
values is advisable during post-treatment. In the first 5 days after operation
we help the microcirculation by providing macromolecular plasma substitutes.
Regarding heparinization the opinions are divided, antibiotics treatment can be
given on case by case basis.
Adequate
bandage is a must, careful monitoring also essential. If complication arise,
possibly the same surgeon must avert it who completed the primary operation.
This basic rule is advisable regarding subsequent reconstruction operations,
plastic surgeries as well. These interventions are appropriate after several
weeks, or month, when we already observed the returned functions, movements. In
case of reconstruction operations we must respect patient needs, cooperation
ability. Of vital importance is to guide the patient’s psyche correctly,
also to interpret the healing process adequately. The correct documentation of
the replantation is in the interest of patient and hospital personnel alike.
[ back to top ]
Microvascular tissue transplantation
Background
Personal conditions in case of tissue transplants mean professional, skilled physicians with adequate microsurgery training. The first clinical results in microsurgery regarding tissue transplants were toe transplantation to hand by Cobbet (1969), free skin transplant by Harii, Ohmori and Ohmori (1972), and muscle, skin-muscle, bone, greater omental transplants published by several authors.
[ back to top ]
Toe transplantation to hand
Experimentally Buncke, clinically the first toe transplantation to hand were perfected by O’Brien in 1977. The anatomical base of the procedure was the arteria dorsalis pedis next to the arteria tibialis anterior and I. intermetatarsalis artery where the branch ends providing for the II. toe. At the II. toe besides feeding arteries bending and flexing sinews, also nerves providing sensory tasks are well preparable. In Hungary two teams completed II. toe transplants, first Simonka and his team, then surgeons from Pécs in 1981. The operation begins with the preparation of thumb stump, and then by analyzing the providing and receiving surface with the help of angiography pictures, we prepare the vein tissues. After the isolation of foot and hand we prepare according to the needs on the foot a smaller or bigger lobe on the back of the foot, then proceeding from the outside to the inside we isolate the veins, nerves, the I. intermetatarsalis artery, flexor and extensor sinews, nerves, with special regard to plantaris nerves, finally depending on the estimation of the future length of the finger we prepare the bone for transplantation. We continue with the bone stabilization after the severing of the finger on the receiving area, next we suture the artery and veins; finally we reconstruct the tissues providing the sensory and movement tasks. We finish the operation by suturing the skin, respective the reconstructing of the foot. Rehabilitation begins 2-3 days upon the operation.
[ back to top ]
Toe transplant
We can carry out toe to replace truncated thumb, or in case of abnormality of thumb. In case of truncations, if whole thumb radius is missing, we take with the finger to be transplanted a larger skin lobe from the back of the foot. Supplementing a thumb is expedient to do even when the index finger is intact to secure a basic gripping ability. In case of supplementing index fingers, the aim is to enhance gripping ability. To ensure the above, we transplant from each foot an II. toe.
![]()
Toe
transplant indications in case of thumb supplementation:
• if two fingers are missing
on the radial side,
• if thumb supplementation not
feasible with pollicisation from hand,
• if the patient opts for this
kind of operation.
Index
finger supplementation indications:
• when all three-jointed
fingers missing,
• if the thumb or just one
finger remained at the ulnary side,
• if the function expected is
solved this way.
Anatomical structure allows the transplantation of II. III. fingers en block. On foot good functionality is feasible to reach this way, in case of foot, it is a gravely truncating operation. It must be considered whether the intervention shall be a rewarding one or not from the patient’s point of view.
[ back to top ]
Flaps
In
emergency surgery flap transplants are used to eliminate injuries caused by open
fractures. The aim is to cover bones and osteosyntheses, comprehensive soft
tissue supplementation, and the securing of environment with good blood supply.
We perform island flap transplants with microsurgery method, when local
conditions are nonexistent because of the situation, or these were already fully
exploited by earlier operations. The island flaps to be transplanted are the s.c.
random flaps with vascular pedicle; fasciocutan island flap with preparable vein
trunk; island flap with blood supplied through connective tissue septum and
composite flaps.
In case of
lower arm flaps the vein trunk, the radial artery runs into the depth, supplies
the skin through the connective tissue plate. Beside the well preparable artery
the vena cephalica supplies blood and the medial lower arm sensory nerve
connects to the skin. For that reason this flap is applicable in sensory form as
well.
The lower
arm or Chinese lobe is applicable in case of elimination of remains of leg
fractures, in fresh cases to cover bones and osteosynthesis in free form. If we
create a distal pedicle it can be rotated to repair the hand defects without
transecting the pedicle. It is also a secure solution for purulent joints.
Amongst
flaps used comprehensively is the musculus latissimus flap, with the supply
artery called thoracodorsal artery coming from the axillary artery. The muscle
can be used with or without the skin cover, the wound can be closed with a
direct suture. If need arises the musculus seratus anterior can be attached to
it as well to cover truly large areas. Patients with heel and foot defects and
latissimus flap transplants loose skin sensitivity, consequently trophic ulcers
may easily develop over pressure spots.
On the area
of shoulder blades two flaps can be prepared, the transverse and the
parascapular flaps. Both are fasciocutan flaps, anatomical factors limit the
size of these flaps.
The
vascular system of the foot supports the the use of the dorsal flap as composite
flap. The skin and the extensor digitorum breves could be transposed
independently, but we can transplant the skin together with the extensor sinews
– the bond is secured by the parathenon – and the bones underneath. The proximal
dissection of the dorsalis pedis artery pedicle toward the anterior tibial
artery can supply a considerably lengthy flap. Amongst bone donor sites the
fibula with microvascular pedicle is a favored solution. We prepare the bone
together with the fascia muscularis, to avoid damaging the branches of arteria
peronea supplying the bone. Transplantations of pedicle tissues are very
important areas in the field of emergency surgery, simplifying and solving of
many problematic cases.