|
|
|
Optical an illumination channels |
[ back to top ]
The equipment
Visual equipment
The human eyes provide the brain with two independent, slightly different images of an object. These are then processed into a stereo image that relays how close or far away the object is. Today's minimal access surgery ("MAS") video cameras are monocular-based, therefore they provide only 2-dimension (2D) visualization. The lack of depth perception, inherent in the current technology, significantly reduces a surgeon's ability to determine the size and precise location of anatomical structures and the surgeon's maneuvers, thus impairing their ability to diagnose and operate efficiently. Although high quality equipment benefits every aspect of surgery, it is laparoscopy that requires the highest standards. Since operative laparoscopy is an inherently difficult task, close attention must be paid to selecting, arranging, and tuning the optical-video equipment, setup, hand instrumentation to optimize surgical environment and reduce surgeon fatigue and consequent error.
[ back to top ]
Optical system
Currently
the state of art equipment includes a 3-chip color camera and 19-inch medical
grade monitor, with a maximum resolution of 600 lines, plus a digital image
enhancer (either incorporated into the camera system or as a stand-alone unit),
viewing trough a 10 mm 0� brand new laparoscope, illuminated with 300 W xenon
light source trough a 180 cm long, 5 mm diameter liquid light cable.
Although a properly assembled and tuned laparoscopic system can provide a
reasonably high quality 2D image, complicated reconstructive and suturing tasks
are still a significant visual (and psychomotor) challenge. In order to address
the lack of a stereopsis, three-dimensional (3D) laparoscopes have been designed
but they still require viewing through a TV monitor (with 3D glasses). While
usable, the results have been less than ideal because of the compromises built
into such systems. Lack of consistent image clarity, illumination, and field
size have been the primary problems thus 2D systems are still the equipment of
choice. High definition television (HDTV) and digital processing may offer the
next practical improvement. The first step could be a sharp 2D HDTV color image,
followed by developing the 3D version of it. In comparing the current image to
the one available through a stereoscopic surgical microscope it is obvious that
further advancements are still far off in the future. In the meantime, a high
quality 2D video system will suffice, especially if the surgeon develops the
needed visual perception and visual memory, psychomotor skills, and transforming
this information into a "virtual 3D" image.
[ back to top ]
Laparoscope
The term "laparoscope" originates
from two Greek words. The first part means "the soft parts of the body between
the rib margins and hips," or, more simply, the "flank or loin." The other Greek
root is skopein, which means "to see or view or examine. "Skopein"
has become "scope" in English. The laparoscope is an optical
instrument through which structures within the
abdomen
and
pelvis can be seen.
A small surgical
incision (3, 5, 10
or 12 mm) is made in the abdominal wall to permit the laparoscope to enter the
abdomen or pelvis. A diversity of tubes (ports) can be pushed through the same
incision or other small incisions, permitting the introduction of probes and
instruments. In this way, a number of surgical procedures can be performed
without the need for a large surgical incision.
|
|
|
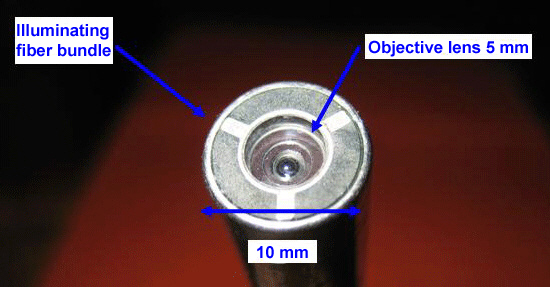
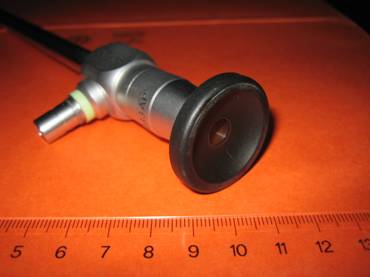
Optical an illumination channels |
This is the optical component of minimal access surgical equipment with its built-in fiber-opticillumination channel surrounding the Hopkins rod-lens channel and a separate light source delivering the light via fiber-optic or liquid cables. To this (ocular) the closed circuit video camera is attached. Also there are combined systems where the video camera is permanently attached to the laparoscope ocular lens
 |
Other variation is where the video sensor and a short objective lens are directly attached to the tip of a 10 mm diameter stem. This is appropriately called chip on the stick. The perceived advantage is the simplicity of manufacture and the tip can be stirred around like the flexible endoscope. Improved image quality is not achieved therefore it remains only an option.
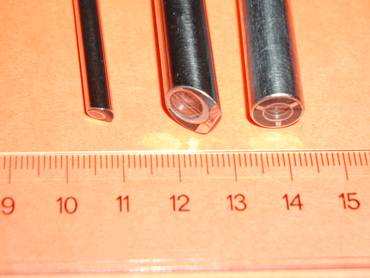 |
| 5 mm and 10 mm laparoscopes |
Laparoscopes vary in their physical dimensions; however, the most practical sizes are the 5 and 10 mm diameters and 15-30 cm in length. Usually the laparoscope is straight construction but can be angled for special purpose such as the gynecology angled scope which has a working channel in the laparoscope body, permitting a single puncture approach. This method where the surgeon holds the scope in one hand and manipulates the instrument introduced into the working channel, is still popular for less complicated interventions.
 |
|
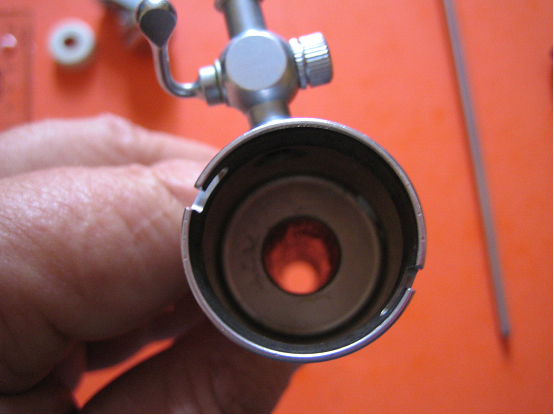
Ocular |
The proximal end is the head or the ocular; this is where the video camera is attached for display on the monitor. This is where one can view the tissue directly with ones own eyes or attach a photographic camera for high-resolution image capture. Below is the input connection for the fiber-optic illumination. The ocular needs to be inspected before attaching the video camera, making sure that it is spotlessly clean.
 |
 |
|
| 0� and 30� objectives | ||
At the distal end is the objective located, nearest the tissue being viewed. It can be 0�, 30�, 45� configuration in relation to the perpendicular cross section of the optical axis.
The 0� laparoscope provides a straightforward view, the 30� laparoscope, forward oblique view. The latter, when rotated, provides a broader range of views. In most cases the 30� laparoscope is preferred for suturing, since it provides more flexible viewing.
|
|
|
Rotation of 0� objective will not change view |
Although the 0-degree laparoscope provides a brighter, sharper image it has a shallower depth of field and therefore is not recommended when an overhead view is required.
|
|
|
30� objective rotation changes the view |
Since the
laparoscope's objective lens is placed in relatively close to the target tissue
fluids and tissue debris can easily splatter onto and adhere to the lens -
especially when tissues and instruments move about actively and particularly
during coagulation. A deterioration of the image clarity is the consequence. The
laparoscope's objective lens should be frequently cleaned, even if the procedure
needs to be interrupted. A common but questionable method of cleaning the lens
involves touching the lens to tissue in the operative site. While this solves
the clarity problem temporarily, it has a potentially detrimental effect. Tissue
fluids can dry onto the surface of the lens during the procedure. Since these
fluids contain proteins, it is harder to clean them off the objective and if any
force is applied it may result in removing some of the optical coating applied
by the manufacturer, thereby permanently reducing optical quality. Submerging
the objective in warm, about 37 �C normal saline and gently wiping with a soft
sterile cloth, applying de-fogger solution, can remedy the situation.
The following regimen represents a better solution in terms of properly
restoring image quality and preserving equipment: gently wipe off the
contaminants of the laparoscope lens and shaft, submerge it in a warm, normal
saline bath (approximately 37 �C), gently wipe it dry with a soft sterile cloth,
and apply de-fogging solution. The trocar should also be cleaned, particularly
at the entry point and inside the cannula. This would minimize the chances of
recontamination.
[ back to top ]
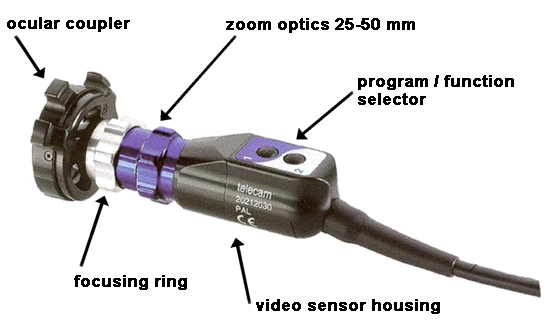
Video-optical coupler
The coupler
between the laparoscope and the video camera is equipped with a focusing and
zooming ring, which are important components and practical features. The adapter
can have various design characteristics to accommodate adaptation to different
laparoscopes in different surgical environments. When increasing or decreasing
the magnification either by turning the laparoscope's zooming ring, or by
advancing laparoscope toward or withdrawing it from the targeted area, the focus
must be readjusted by turning the focusing ring. The depth of field of the
laparoscope is measured in centimeters: the closer the objective is to the
tissue, the shallower the depth of field. Ideally focusing should take place at
the highest possible magnification, then adjusted to the required factor. Auto
focus is the newest feature of video cameras where the manual focusing is only a
backup option.
|
|
The coupler can be detached from the laparoscope ocular ring or can be permanently fixed. Detaching can ease the exchange of components as well as cleaning, storing etc.
Optical adapters
This category of component is situated between the
ocular and the coupler, and can provide additional magnification, image
splitting for a second camera, attachment to surgical microscopes, and other
adaptations.
[ back to top ]
Illumination
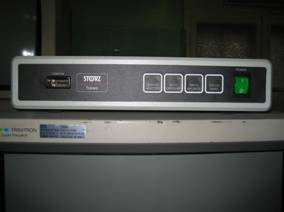
Light source
Working in
a closed environment requires a source of external illumination to be
introduced. Currently the 150-300 W fan-cooled xenon light source is used to
provide ample color-corrected light for extended periods of time without
overheating. The illumination unit generally includes a built-in air compressor.
Although the front panel has includes adjustment controls as well as a switch
for an automatic setting option, the bulb intensity actually remains unchanged.
When the light output setting is changed, slotted wheel turns at variable rates
(depending on the setting), between permitting higher or lower levels of
illumination to the transmitting cable.
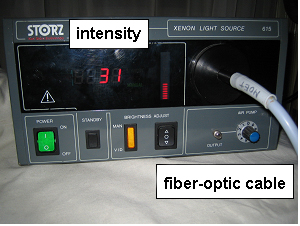 |
| Light source |
[ back to top ]
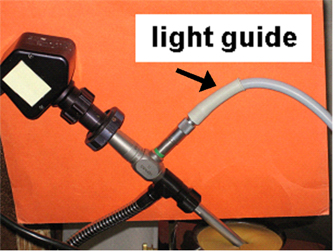
Light guide
The
illumination is transmitted to the laparoscope via a flexible fiber-optic
light guide, between 180 and 250 cm in length, and 0.5-1.0 cm in outer diameter.
This illumination is essentially cold in temperature as most of the lamp heat is
not transferred to the laparoscope. Light toxicity is, therefore, not a concern.
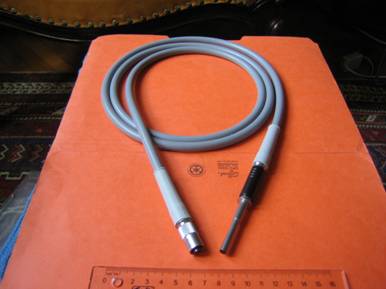 |
| 180 cm long, 5 mm diameter light cable |
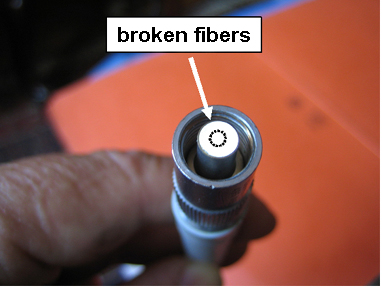
The cable consists of a tightly packed bundle of fine glass fibers protected by an outer sheath and end couplers that fit the output of the light source and the input of the laparoscope light channel. Care must be taken to avoid sharp bending which would cause fiber breakage and consequentially, reduction of transmitted light.
 |
 |
|
| Checking for defects | ||
To test for the amount of light transmitted one can direct one end of the cable toward a white surface or a source of light, and inspect the other end. If many dark spots appear, the cable is damaged; if it is uniformly bright, the cable is in good condition. Instead of fiber optic, the cable could be filled with a specific light-transmitting fluid to provide more efficient light transmission. This type of cable, however, has a less robust construction and is more easily prone to damage.
 |
| 3-chip closed circuit video |
[ back to top ]
The video system
The basis of laparoscopic cameras is the solid-state silicon computer chip, also known as a CCD (charge-coupled device). This consists of an array of light-sensitive silicon elements. Silicon emits an electrical charge when exposed to light and these charges can be transmitted, amplified, displayed, and recorded. Each silicon element contributes one unit (referred to as a pixel) to the total image. The resolution or clarity of the image depends upon the number of pixels or light receptors on the chip. Standard cameras in laparoscopic use contain 250.000 to 380.000 pixels. Final clarity of the image eventually displayed or recorded will also depend on the resolution capability of the monitor.
[ back to top ]
Types of video signals
Closed-circuit video systems used in
laparoscopic surgery were developed from standard television broadcast
technology. Television analog systems read and transmit an image using scanning
lines. In digital systems, a row of silicon elements on the CCD chip replaces
the scanning line. The number of scanning lines repre�sents the number of lines
of information that can be displayed on a monitor.
The standard NTSC (National
Television Systems Committee) format used in North America and Japan consists of
525 lines scanning at a rate of 30 frames per second. Systems used in other
parts of the world (PAL or Phase Alternating Line and SECAM or Sequentiel
Couleur et M�moire) use 625 lines at 25 frames per second. Computer-enhanced
high-definition television (HDTV) systems have more than 1.000 scanning lines
and can incorporate 5 or 6 times more information than standard television and
video formats. By comparison, the human eye can distinguish the equivalent of
some 1600 scan lines and the resolution of 35mm photographic film is about 2300
scan lines. Standard television and simple video signals are composite signals,
image information is carried over a single channel. These signals are subject to
a certain amount of degradation. Dividing the signal into components that are
transmitted over separate channels provides a higher quality image. An example
of this design is the Super VHS (S-VHS or S-Video) which splits the signal into
separate components for brightness (luminance= Y) and color (chrominance=C). An
RGB signal divides the color into red, green, and blue components that are
transmitted over separate channels. A fourth channel carries brightness
information. Modern laparoscopic cameras have multiple outputs on the control
box that permit the operator to select the type of signal output. Monitor or
recording equipment receiving the signal must be compatible to the input signal
in order to display it.
[ back to top ]
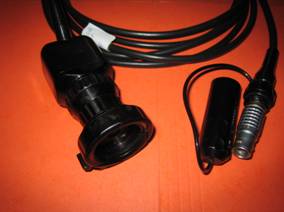
Video sensor
The video
sensor (head) can contain 1- or 3-chip sensor. The 1-chip sensor is economical,
whereas the 3-chip involves an improved image quality. However, the 1-chip
camera is adequate for most tasks.
 |
| Single chip camera head |
[ back to top ]
One-chip camera
As the name implies there is a single CCD sensor is in
the camera head, which is responsible for converting the optical image into the
initial video signal that is processed and displayed on the video monitor.
[ back to top ]
Three-chip camera
The 3-chip camera has separate red, green and blue
sensors for improved color definition, and a RGB connection to the monitor is
recommended. The advantage of this design is better color rendering which is
important in the live tissue environment. The increased price, however, may not
be proportionate to performance improvement, since a well-tuned single-chip
camera can also produce a nearly identical image.
It is important to note that the video system will only display what is
available through the optical system. In other words the both the optical and
video components need to be tuned and optimized together to obtain the highest
quality displayed image. The camera head can also contain menu and control
buttons to enable convenient changes for the various video settings, such as
white balance, sharpness, etc.
A second camera may be used in a procedure that enables two simultaneous images
originating from different locale such as in common bile duct exploration. This
could be achieved with two separate video sets or using a Twin Video Control
Unit which puts both images into one monitor in a split configuration.
 |
 |
|
| One chip and three chip cameras | ||
[ back to top ]
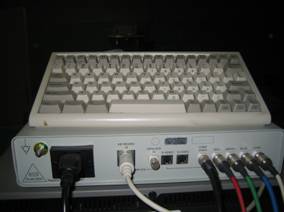
Control unit
The initial video signal is fed from the camera head to the control unit via a cable ending in a specific connector that permits attachment to the control unit in only the correct orientation. The input video signal from the head is then processed and sent to the output connectors; cables then connect to the display and recording devices. Image processing is an important aspect of image quality, and much can be gained by the use of good software, as well as adding useful features such as digital enhancing, twin video, image reversing, fiber filter, etc. A keyboard can be used to input alpha-numeric data or labels, as well as the timing of events. The signal outputs can be in the form of a composite, S-VHS, RGB digital, etc. The best image can be obtained using connections to the RGB terminals.
 |
 |
|
| Front and back | ||
Image quality can be improved via digital processing. The original image is captured as an analog signal. This signal is transmitted as a continuous electronic waveform that is subject to interference and distortion. Digital processing converts the analog signal into binary code, which better preserves the original information and lessens distortion during reconstruction. Unlike analog images, digital recordings retain the quality of the original when duplicated or copied. Digital recordings can also be enhanced and modified for other applications in ways that analog images cannot.
[ back to top ]
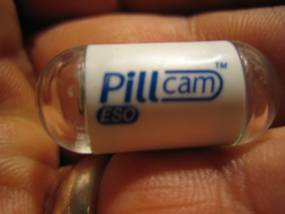
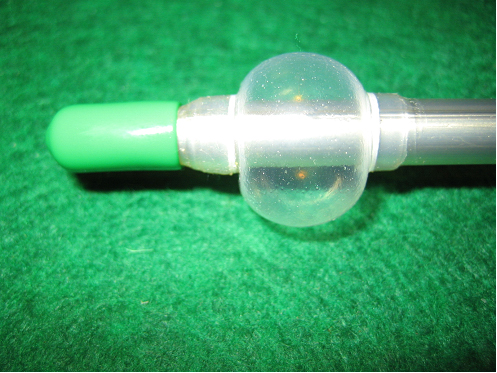
The pill camera
 |
 |
|
| Side and objective lens view | ||
A miniature, self-contained video camera. It is used for intraluminal exploration of the GI tract. The camera makes video picture of the inside and transmits it to the extracorporeal receiver. The diagnostic value adds to the planning of laparoscopic intervention.
[ back to top ]
Video monitor
Standard, consumer-grade video monitors have 350 lines of horizontal resolution, whereas medical-grade monitors involve approximately 600 lines and the most suitable for laparoscopic surgery.
 |
| 19" monitor |
The display is usually placed on top of a cart or on a ceiling mount for viewing by anyone in the room. This, however, is the least natural or ergonomic position for the surgeon to view.
[ back to top ]
Projected video screen
An
interesting proposition is positioning of the display near the actual surgical
sight in the form of a projected image onto a rectangular plate. Opinions are
varied regarding this option, perhaps because of the ingrained habit, security,
familiarity and the slight inferior quality image.
 |
| Projected video screen |
The importance of obtaining a top-quality video image cannot be over emphasized. The surgeon must attend to details such as lens cleaning, focusing, etc., and therefore, the availability of properly functioning electronics is essential. Electronic signal processing can not overcome the limitation of a laparoscope that is damaged or a lens that is fogged, or otherwise contaminated. The ocular and objective lenses of the laparoscope as well as the camera lens must be checked for clarity. The objective lens can be cleaned internally with irrigation and externally by wiping with cotton gauze soaked in warm water (not saline) and then wiping with dry gauze before applying anti-fogging solution. It is also important that the cannulas are clean inside prior to the intro- or reintroduction of the laparoscope.
[ back to top ]
Recording media
|
|
|
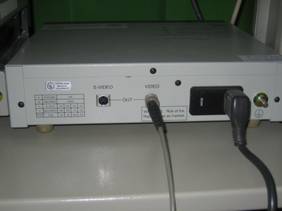
Control box output hookups |
There are
multiple options for documenting laparoscopic procedures as either continuous
recordings or still pictures. In this era of electronic data management the
present state-of-the-art would involve digitalizing images for storage on
magnetic or optical disks; however much documentation is still done using
videotapes. Videotape recording is obtained by attaching a videocassette
recorder to control unit. A variety of videotape formats is available; such as
VHS and 8 mm are acceptable but they are inferior in quality to S-VHS, and high
8 mm. digital video recorders provide an even higher quality than analog
recordings but are more expensive. The best quality still images are
celluloid/emulsion photographs taken through a 35 mm camera attached directly to
the eyepiece of the laparoscope. Unfortunately, this method is generally
cumbersome and therefore less practical. Laparoscopic digital images can also be
put on a disk and stored on optical (laser) or floppy disk for later retrieval.
The way in which the video recording equipment is connected to the video system
is important. If the camera control unit has multiple outlets for component
signals (Y/C, S-Video, or RGB), then both the recorder and the primary monitor
can be hooked up to the control unit directly. For example, one Y/C port can be
connected to the recorder and the second Y/C outlet or the RGB outlet (depending
upon the camera control unit) can be connected to the monitor. This is a
parallel arrangement and neither the recorded image nor the image displayed on
the monitor will be degraded. In a serial hookup the camera, recorder, and
monitor are connected in a line. If the signal goes to the recorder first and to
the monitor second, the image on the monitor may be somewhat degraded. If the
signal goes to the monitor first, the quality of the recorded image will not be
as high. As the complexity of the system increases, problems due to loose or
incorrect connections become more likely.
For digital recording special units are available which can connect to the
camera�s Y/C or RGB outputs unless there is a digital output. The images, both
video and still, are recorded to an internal hard drive; after finishing the
procedure they can be recorded ("burned") onto a DVD disk. The captured images
then can be replayed, edited, and copied without degradation. Although this is a
mature technology, with the development borrowed from the entertainment
industry, constant improvements and changes are expected.
[ back to top ]
Cabling
|
|
|
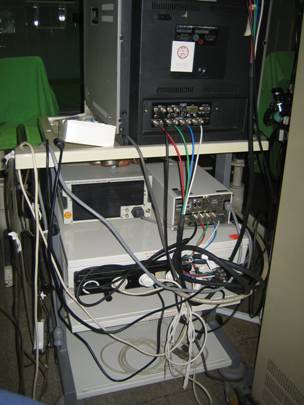
Laparoscopic tower |
[ back to top ]
From video head to control unit
 |
| one chip camera and camera input |
[ back to top ]
From control unit to monitor(s)
 |
 |
|
| composit connection | ||
 |
||
| back of monitor | ||
[ back to top ]
Energy sources
In the application of electro surgery,
laser, and ultrasound equipments are converting various forms of energy to heat.
Many of the instruments are modifications of those used in open surgery.
Intimate knowledge of the principles and risks of electrosurgery will help
prevent iatrogenic injuries.
Electric energy has three effects on living tissues. When an active electrode is
in direct contact with tissue proportional to the resistance heat is generated,
the heat is dissipated into the tissue, and with time, desiccation necrosis
occurs. As the electrode is drawn away from the tissue, much of the heat is
dissipated into the air, reducing the amount of desiccation but producing two
other properties of electric current, namely, fulguration (coagulation) and
vaporization (cutting).
Coagulation is caused by sparks of high-voltage electricity passing through the
tissue and is maximal when a low-current, high-voltage waveform is delivered.
Cutting is maximal when high-current, low-voltage energy waveform is delivered,
which causes a cushion of steam to develop between the electrode and the tissue.
Tissue vaporization occurs from sparking across the steam gap. A blended
waveform is a mixture of these two waveforms to deliver both cutting and
coagulation.
[ back to top ]
Monopolar cutting/coagulation
 |
|
Monopolar gastric cut on fresh tissue model |
With a monopolar system, it is advisable to stroke the tissue gently with the electrosurgical instrument to maximize the cutting or coagulation and minimize desiccation. With a bipolar system, the tissue is usually pressed between the electrodes, so desiccation occurs regardless of the waveform used.
 |
 |
|
| Ground pad and conventional cut/coagulation pencil | ||
The ground pad should have a surface area
of approx. 50 cm2, placed over muscular tissue, and coated with a
conductive gel to enhance conductance. Older monopolar systems were known as
ground reference systems, because current from the active electrode could return
to ground through any site where the patient was grounded, the surgeon or any
part of the patient that is in contact with metal. Although the current usually
returned through the ground plate, there was also a risk that it could pass
through an alternate site typically a metal stand in contact with the patient's
arm and cause an alternate site burn. If one of these systems is used, it must
be ensured that the patient is isolated from any metal objects except the ground
pad.
Now in use are the isolated systems where the current can return only through
the ground pad, which eliminates this risk. Another kind of injury with
monopolar systems is pad site burn, which can occur when the ground pad is
partially separated from the skin so that the current exits through an area
smaller than the prescribed 50 cm2.
An advance that prevents this injury is return electrode monitoring, which
consists of an electronic system in the generator that continuously monitors
conductance of the ground pad and automatically disables the instrument and
sounds an alarm if conductance is inadequate. During laparoscopic surgery, when
the patient may be frequently turned and metal instruments may contact the
patient's body, it is recommended to use a modern isolated system with return
electrode monitoring.
[ back to top ]
Monopolar
electrosurgical instruments
Electrosurgical instruments have been
invaluable in helping the surgeon to perform a haemostatic dissection. Both
disposable and reusable instruments are available. The hand-held instrument is
connected to an electrosurgical unit for the delivery of current in either
cutting or coagulating mode. As stated earlier, if the electrode is immersed
into the tissue, then regardless of the waveform, the primary action of the
electrode on the tissue will be desiccation (tissue necrosis). The delivery of
current may be initiated either by a foot switch, as in open surgery, or as is
popular in laparoscopic procedures, by a rocker switch on the hand-held
electrosurgical device handset.
 |
 |
|
|
Laparoscopic irrigation/suction/monopolar hand piece with rocker switch selector |
||
Handsets that incorporate suction-irrigation devices also contain hand switches for these purposes. To avoid repeat sterilization, the handsets that incorporate suction irrigation devices are only available as disposable instruments. The design of the electrode tip determines the functional capabilities of the instrument, although there is considerable overlap between the function of different electrode configurations.
[ back to top ]
Bipolar system
A bipolar system, in contrast, places the tissue between two electrodes, so the current passes from one electrode to the other through the interposed tissue. The contact surface of bipolar tips, tissue mass and wattage needs to be balanced to get proper function. Newer systems may have an automatic feature to take care of this.
 |
 |
|
| Bipolar forceps with isolated tips (+/- contact pins) | ||
There is no need for current to pass
through other tissues and thus there is no risk of injuries. This is an often
used technology in precision coagulation, such as in peripheral vascular and
microsurgery. In essence, the energy is delivery is strictly limited to the
target tissue.
Bipolar current is used principally for hemostasis and selective coagulation. As
tissue desiccation occurs from the bipolar current, the resistance of the tissue
changes. An automatic control electrosurgical generator for bipolar current will
maintain the waveform in the face of the changing tissue resistance. It is best,
therefore, to use an electrosurgical unit dedicated to bipolar use when using
bipolar electrodes.
[ back to top ]
Hazards of laparoscopic electrosurgery
Electrosurgery, although used by most surgeons, is not without risks, especially in laparoscopic surgery. This is partly because of the decreased field of view which increases the likelihood of accidental injury and its concealment. The problem stems mainly from stray current, which may cause visceral injury during laparoscopic surgery in three ways:
Insulation break
A break in the insulation of an electro
surgical instrument allows current to flow from that point to any contacting
tissue, where a thermal injury may occur. Greater vigilance is required with
reusable instruments, because the insulation is more subject to damage with
repeated handling.
Direct coupling
The current may pass from the electrode to
the laparoscope or another non-insulated metal instrument and cause a burn where
this secondary electrode comes in contact with tissues. This is less likely to
occur if the cannula through which the laparoscope is inserted is made of metal,
because the cannula can then disperse the current through the abdominal wall
into the return electrode. This has lead some authors to recommend the use of
all-metal cannulas during laparoscopic electrosurgery.
Capacitive coupling
A capacitor is defined as two conductors
separated by an insulator. Capacitors can store electric charge. During
laparoscopic electrosurgery, the electrosurgical device behaves as one
conductor, the surrounding metal cannula behaves as the other conductor, and the
intervening intact insulating sleeve of the electrode behaves as the insulator.
This arrangement can serve as a capacitor and accumulate electric charge if the
electrode is activated before the tip is placed in contact with the tissue. As
long as the metal cannula is in direct contact with the abdominal wall, the
charge may escape safely to the return electrode. If a plastic holding threaded
sleeve is used to anchor the metal cannula to the abdominal wall, the metal
cannula is isolated from the abdominal wall, and the accumulated energy may
discharge through a point of contact between the cannula and the intestine.
Therefore, the arrangement of an electrosurgical device within a metal cannula
that is anchored with a plastic sleeve is potentially hazardous. A useful rule
of thumb is to always use metal sleeves with metal cannulas and plastic sleeves
with plastic cannulas. Capacitive coupling can also occur between the electrode
and another metal instrument. Capacitive coupling can be avoided by not
activating the cautery until the tip is in contact with tissue, so the current
has a route to reach ground and is not transferred into a capacitor.
[ back to top ]
Laser
In Laser (Light Amplification by the Stimulated Emission of Radiation) surgery the photon energy of light waves is converted to kinetic energy (heat) in body tissues for cutting or coagulation. The impetus for the development of this tool was the fear of injury from stray current in monopolar electrosurgery. It has been widely applied as such by gynecologic laparoscopist, but after an initial surge of enthusiasm, most general surgeons have abandoned lasers in favor of electrosurgery. The aim of this section is to review the basic physics of lasers relevant to laparoscopic surgery as well as to discuss some reasons for the differing usage by gynecologists and general surgeons.
[ back to top ]
Laser physics
Laser energy may be delivered continuously or as a series of
short pulses. Continuous delivery allows heat to build up and to spread into the
tissue to produce a larger lesion than intended. Pulsing may reduce this risk as
the energy of one pulse is partly dissipated before the arrival of the next
pulse. The damage, therefore, is more localized.
A laser is a monochromatic coherent beam of light. In other
words, all the waves of light in the beam are of the same wavelength, and they
are in the same phase in time and space. This coherence results in an additive
effect of the entire individual light waves. The particle responsible for the
transmission of energy in a light wave is a photon. The medical effect of a
laser is due to the absorption of light by the tissue and the conversion of the
photon energy to kinetic energy (heat).
[ back to top ]
Delivery of Laser
Laser energy may be delivered to the tissues either as a free
beam or as a contact tip. The free laser beam may be delivered to the surgical
site by a variety of laparoscopic catheter systems that may also incorporate
suction-irrigation channels. The laser beam diverges 10� to 15� as it leaves the
delivery catheter, so the power density decreases with distance from the
catheter to the tissue. The effect of the laser beam changes from cutting to
coagulation as the delivery catheter is backed away from the tissue. The carbon
dioxide laser, in contrast, creates a focused beam, similar to a beam of
sunlight focused by a lens. Carbon dioxide lasers are not widely used in general
surgery. The main risk with laser beams is accidental visceral injury due to
past pointing of the beam. The laser energy may also be transmitted through the
tissue being worked on and damage tissues elsewhere. For example, the bowel has
been injured by using an Nd:YAG laser to excise a mucosal bladder tumor even
though the bladder was not perforated
[ back to top ]
Ultrasound
Ultrasound results from a mechanical vibration and consequent sound wave at a frequency above the audible human range (i.e. greater than 18.000 cycles/s). Ultrasonic energy has been used diagnostically and therapeutically. Diagnostic tools have used ultrasonic sound waves while therapeutic devices depend on ultrasonic vibrations.
[ back to top ]
Diagnostic ultrasound
A piezoelectric material is a non conducting material that
develops mechanical strain when placed in an electric field or, conversely,
generates an electric signal if mechanically strained. An electric current makes
piezoelectric crystals vibrate at high frequencies. If the crystal is in contact
with the body, an ultrasonic wave is transmitted through the body and reflected
at tissue interfaces. A second piezoelectric crystal is placed in the path of
the reflected wave and the electronic signal generated used to indicate the
placement of the tissues.
[ back to top ]
Therapeutic ultrasound
When piezoelectric crystals or a magnetic
device convert electric current to mechanical vibration, the motion can be
amplified and coupled to a metal probe to transfer the energy to a tissue. The
use of therapeutic laparoscopic ultrasound makes use of two different properties
that each depend on the frequency of ultrasonic vibration. In practice, the
frequency of mechanical vibration of a piezoelectric crystal is inversely
related to its amplitude. Therefore, at 23 to 24 KHz, the tissue effect is
cavitation. At the higher frequency of 55.5 KHz, the lower amplitude oscillation
of the probe gives a cutting effect.
Cavitation
The effect of mechanical vibration at 23
to 24 KHz is cavitation, which occurs as the pressure wave created by the
surgical probe is transmitted through the tissue. At a cellular level, this
causes either an explosion of cells of high water content (adipose tissue, some
tumors, the lens, etc.) or implosion of cells of very low water content (e.g.,
calcified tissue). Because tissues of moderate water content, especially
collagen, do not absorb ultrasonic energy, some tissues, such as fat, are
affected whereas others with much collagen, such as blood vessels, biliary tree,
bowel, and muscle are not. This produces selective tissue fragmentation, which
allows vessels to be skeletonized from within fatty structures. For example, the
cystic artery and duct can be isolated from fat or edema within Calot's
triangle.
Cutting
For ultrasonic cutting, a blade is made to
oscillate at 55.5 KHz, a much higher frequency than used for cavitation devices.
At this frequency the blade denatures collagen to form a coagulum, which seals
small vessels. This instrument can cauterize and cut simultaneously without the
risks of electrosurgery.
[ back to top ]
Access
It was recognized early on that the surgical incision itself contributed to the overall operative trauma. The greater the incision, the greater surgical trauma the patients have to recover from. There was a tendency in the 60�s to reduce the excess incision and find the smallest possible opening to carry out the surgery. The final culmination of their search was the minimal excess surgery. In the abdominal cavity a large dome-like space needs to be created to displace the viscera, enable the surgeon to see and move about the instruments. Mechanical distension of the abdomen has been used, but gaseous distension is the most popular. This may be done by instilling a gas, under pressure, into the peritoneum. This method is currently the most popular, because it is easy and allows uniform distension of the peritoneal cavity. Also one can develop a space by making a hole in the abdominal wall and lifting it to allow room air into the peritoneal cavity.
[ back to top ]
Choice of gas
The ideal gas used for creating a pneumoperitoneum should be biologically inert, absorbed harmlessly and rapidly into the bloodstream (so that it does not persist in the peritoneum after the procedure) and not support combustion. Carbon dioxide, although not inert, is currently the most widely used gas, despite some complications with prolonged use. Alternatives include helium and nitrous oxide. Nitrous oxide has a lower absorption into the bloodstream and is therefore recommended only for short procedures. It also has the potential to support combustion. Medical grade carbon dioxide is inexpensive and supplied in portable tanks that fit conveniently to the side of most instrument carts. K. Semm suggested the desirability of warming and humidify the gas to prevent hypothermia and desiccation in elderly patients.
[ back to top ]
Insufflator
 |
 |
|
| Carbon dioxide tank pressure reducer | ||
An insufflator is designed to deliver gas for establishing and maintaining the pneumoperitoneum. In addition to the delivery of gas, insufflators have the ability to control the maximal flow rate of the gas and the pressure of gas within the abdomen. The insufflator has an inlet valve for connection to a gas tank and an outlet port from which sterile plastic tubing is passed to the patient and is used to deliver the gas.
[ back to top ]
Flow rate
The flow of gas is controlled either in a stepwise fashion (low, medium, or high) or preset by a dial in liters/minute. Low flow rate is 1+ L/min, medium flow is to 3 L/min, and high flow is greater than 4 L/min. The newer insufflators allow the exact flow rate to be set and usually offer flow rates of up to 10 L/min. A flow rate of 1 L/min is used in the initial instillation of gas when establishing a pneumoperitoneum in the blind technique. A digital flow rate indicator is present on most machines. Once the desired intra-abdominal pressure is achieved, a continual display of a flow rate greater than 1 L/min is indicative of a leak from the system, most commonly from one of the cannula sites. High-flow insufflators are available, which deliver flow rates of up to 20 L/min. These high-flow insufflators are often used during prolonged laparoscopic procedures with five or more trocar sites, during which there is often significant loss of gas.

Although a standard insufflator can usually keep up with this loss, the high flow rate insufflator has the potential advantage of being able to restore the lost pneumoperitoneum much more rapidly. This feature is useful when the surgeon uses an irrigation device, which depletes the pneumoperitoneum. An important point to consider, however, is that the maximal flow rate depends also on the impedance to flow as it does on the delivery of gas by the insufflator. A simple test is to connect the insufflator tubing to the gas port of an open cannula. One can now assess the maximal flow rate through this delivery system (typically about 9 L/min). In practice, this is often less than the maximal flow capability of the insufflator. This means that it is usually not possible to increase the flow with a high-flow insufflator. The maximal impedance to flow is usually in the inlet valve of the cannula. Placing a large instrument through the cannula causes a further impedance to flow.
[ back to top ]
Pressure
The pressure monitor reflects the total
resistance to the instillation of gas. Therefore, in addition to the pressure
within the abdomen, the reading reflects the impedance to flow within the
delivery apparatus (connecting tubing and Veress needle or cannula). The
pressure reading only equals intra-abdominal pressure when the flow rate
approaches zero. At higher flow rates, the pressure monitor actually measures
the pressure within the delivery apparatus. The surgeon should therefore
remember that a high intra-abdominal pressure reading will be inaccurate if
there is a high resistance to flow in the delivery apparatus, or if that reading
is taken at a time of high gas flow. Once the preset pressure is achieved, the
insufflator is designed to halt the delivery of gas and to recommence when the
pressure falls below the preset level. In this, way the intra-abdominal pressure
is maintained at a constant desired level throughout the procedure. Most
insufflators have an alarm system that sounds when the pressure exceeds the
level preset by the surgeon.
In addition to indicators for the
intra-abdominal pressure and the flow rate, the insufflator has an indicator to
show the total volume of gas delivered and a dial to show the amount of gas left
within the gas tank.
[ back to top ]
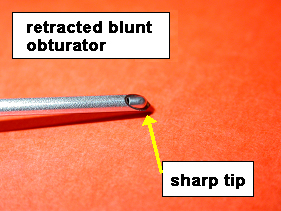
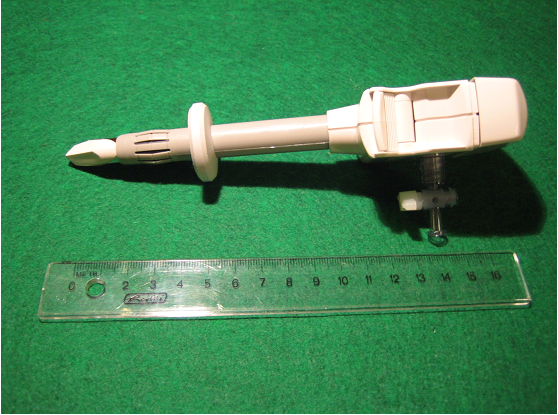
Veress needle: blind technique
 |
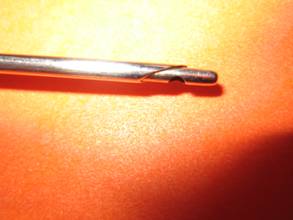 |
A Veress needle is currently the device most commonly used for gaining access to the peritoneal cavity before insufflation. This needle has blunt obturator, which retracts on contact with solid tissue to reveal a cut�ting tip. A marker on the hand piece moves upward as the obturator retracts to expose the cutting tip. Once the peritoneal cavity is entered, gas may be instilled through the hollow shaft of the needle. The needle is then removed, and a trocar/cannula is inserted through the same site. This method of peritoneal access is referred to as the blind or closed technique.
 |
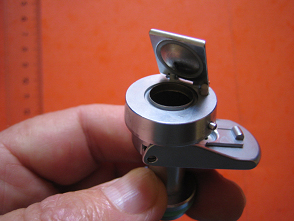
| Safety tip retracted |
 |
| Variety of cannulas |
[ back to top ]
The trocar-cannula apparatus
Trocar: a sharply pointed shaft, usually with a three-sided point. A trocar may be used within a cannula, a hollow tube, designed to be inserted into a body cavity. The word trocar is derived from the French "trois" (three) + "carre" (side). A trocar is, strictly speaking, the cutting obturator within a cannula. In practice, the term trocar is commonly used by surgeons to describe the whole trocar-can�nula apparatus.
 |
| Trocar assembly |
Once the pneumoperitoneum is established,
a cannula or port must be inserted to allow the passage of the laparoscope and
operating instruments into the abdomen. The entire appara�tus is inserted
through the abdominal wall into the peritoneum.
Cannula: this is the working channel. Its outer and inner dimensions differ by
the thickness of the material with which it is made. The size of the channel
differs depending on the manufacturer. For 5 mm trocars, the diameter of the
inner channels varies between 4.5 and 5.5 mm. It is important to know the exact
size of the inner channel the outer diameter is also a constraint, as it will
determine the size of the incision. Ideally the sleeve should be thin-walled.
Tip: the trocar tip or obturator facilitates entry through the abdominal wall
into the peritoneal cavity. Different types of tips are available: conical,
blunt, pyramidal, dilating etc. Sharp tips cut an entry path through the
abdominal wall while blunt tips stretch the tissues apart to gain access to the
abdominal cavity.
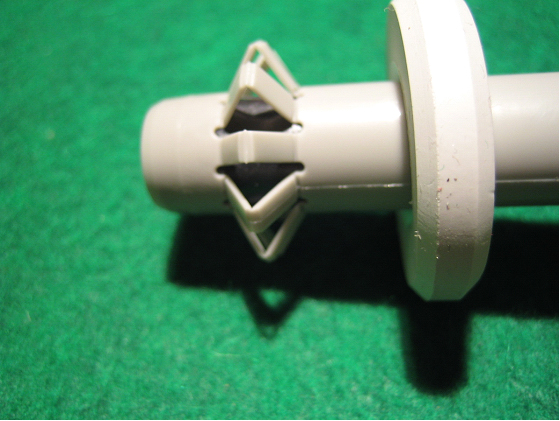
As a safety feature, most disposable cannulas are equipped with a plastic
sleeve, which automatically covers the cutting obturator once it has pierced the
abdominal wall. Alternatively, some devices use a blunt, spring loaded tip that
pushes forward in the shaft of the cannula after the trocar has pierced the
abdominal wall.
 |
| Spring loaded tip |
The gas pressure of an established pneumoperitoneum is above the surrounding atmospheric pressure. In order to prevent gas leaking from the port sites, the trocar incorporates a valve. This allows the insertion of instruments without the escape of gas. Different valve systems exist including flap valves, piston (trumpet) valves, duckbill valves and magnetic ball valves.
 |
|
Flap valve |
Many trocars are equipped with a port that allows for the insufflation of gas into the operative cavity. Some trocars do not have this port, notably trocars < 5 mm in diameter.
 |
 |
Reusable cannulas do not have this safety feature. The presence of this "safety feature" may not prevent a trocar-related injury for two reasons. First, the plastic sleeve that covers the trocar may get caught up in the peritoneum, leaving the cutting edges of the trocar dangerously exposed within the abdominal cavity, with a subsequent risk of visceral or vascular injury. Second, the speed at which the safety shield snaps into place may be exceeded by the speed at which the trocar enters the abdominal cavity and pierces an adjacent viscous or vascular structure. This risk is higher, the greater the force of insertion, and also in the presence of adhesions, which are likely to bring structures such as bowel close to the anterior abdominal wall. No empirical evidence indicates that the safety shield reduces the incidence of complications during trocar insertion. The use of a disposable trocar-cannula apparatus, therefore, does not guarantee safety.
[ back to top ]
Securing the port
Ideally, a trocar should be firmly held in the abdominal wall to reduce the risk of slipping out. Some manufacturers have developed textures, threads on the outer surface of the trocar that help to grip the abdominal wall. There are also various systems for fixing the trocar to the abdominal wall. This is particularly useful when the pneumoperitoneum has been established by the open approach and the entry site is large providing little grip for the trocar, frequent and repeated instrument movement such as in suturing, scoping and if the skin incision is cut too large (novice). In addition to the trocar-cannula screw apparatus, there are the option of securing the cannula to the abdominal wall by several means; a balloon inflatable at the tip or an opening of a rosette. Simplest is placing a purse string thread that anchors the cannula to the abdominal wall.
 |
 |
|
| Deployed internal rosette | ||
Internal balloon: the trocar is equipped with an inflatable balloon at its tip. The balloon is inflated after introducing the trocar into the abdominal cavity. External compression is achieved with a soft ring that presses against the opening and locks to the trocar.
 |
| Trocar components |
 |
 |
|
| Internal inflatable balloon, external securing ring | ||
[ back to top ]
Reduced trauma
access
Port incisions range from 1.8-3-6-11-13
mm. These small incisions indeed merit the minimal invasive access concept. The
incision accepts the "port" which is the hollow cannula with space to accept the
laparoscope, a valve for hooking up the CO2 insufflators and a sharp
insert trocar for making the initial penetration into the abdominal cavity. To
minimize the entrance trauma further and avoid incidental bleeding, innovative
variation were developed.
1. Direct view access using a laparoscope in the port during insertion and
visually observing the see trough tip progression in the tissue layers.
2. "Don't cut - separate": instead of sharp cutting trocar tips, conical or
screw shaped separating tips were designed.
3. Radially expanding ports are inserted trough a smaller incision and than
expanded to their nominal diameter. This may be safer than conventional and
non-bladed trocars. It uses radial dilation to separate - not cut - muscle and
fascia. These may reduce incidence of vascular injury, bowel/bladder injury,
adominal wall bleeding, incisional hernia.
 |
 |
|
|
Screw tip port where the tip actually gradually separate tissue layers |
||
[ back to top ]
Disposable
Mostly
plastic construction intended for single use. After human operations the animal
lab can use this, although it will not last long, most often the valve gets
damaged, and the top sealing ring gets cut. Some surgeons prefer it since brand
new they function well, and reduce personal labor in handling. The choice of
disposable and/or reusable instruments depends on local health policies, and on
limitations of sterilization and human resources. The process of cleaning,
disinfection and sterilization is time-consuming and requires specialized
equipment and personnel. Disposable instruments avoid such necessities.
Disposable instruments should not be reused: these are not designed to be
cleaned. Biological fluids infiltrate into the mechanisms, which can never be
properly washed out. Sterilization will not destroy all microorganisms within
heavily contaminated instruments. Disposable instruments use materials, which
are not designed for high temperature autoclaving. Heat can damage the
mechanical components of these instruments (melting of plastics, blockage of
joints, dysfunction of safety system, etc.) making them malfunction and unsafe.
 |
| Top seal ring |
Disposable equipment: gas connection system, tubing, drapes, ports, rarely used special instruments, clips and stapling devices when numerous clips or staples are required. During most laparoscopic procedures, a combination of both disposable and reusable instruments is commonly used.
[ back to top ]
Reusable
For
instruments that are used frequently, and whose cost is high in their disposable
version, a reusable version is practical, such as coagulation hooks, graspers,
needle drivers, scissors for special use. These instruments can be easily
cleaned and sterilized in an autoclave, soaked or gas sterilized.
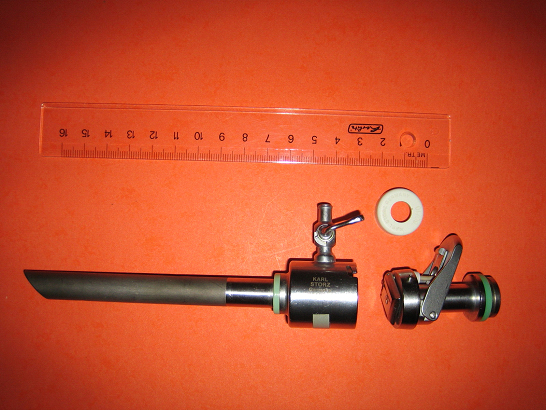
Disassembled cannula for cleaning. Mostly stainless steel, take apart construction. This not only helps in cleaning/sterilizing but also in swapping out damaged components.
|
|
 |
|
| Inspecting valve assembly | ||
Although initially expensive but on the long run the savings are significant. Cleaning, sterilizing, repairing require personal labor that adds to the ultimate cost. At the beginning of surgical video-laparoscopy (1987-1990), most trocars used were reusable trocars. These trocars were composed of dismantable parts that are screwed together. Some had an insulated sheath for use with electrosurgery that latter was discarded in favor of monopolar safety. These trocars have the advantage of a reduced operational cost, but cleaning and sterilization involve dismantling and reassembling. The high costs of cleaning and sterilization of these trocars has led many surgeons to switch to disposable equipment. As the price of disposables had risen the resposable and the reusable ones become economical.
[ back to top ]
Sterilization and cleaning
The
sterilization of surgical instruments must comply with safety standards. These
vary depending upon the legislation of individual countries each of which may
which require different sterilization systems and sterilization times. For
example: Germany: sterilization for prion (Creutzfeld-Jakob Disease)
is required by law. For this reason, German legislation requires steam
autoclaving at 134�C for 5 minutes. Among the numerous sterilization agents
there are the most commonly used:
- ethylene oxide;
- steam autoclave;
- hydrogen peroxide.
For instruments that were sterilized with gamma rays, certain sterilization
processes (e.g. ethylene oxide sterilization) will cause toxic residues to be
freed.
[ back to top ]
Gasless
Gasless laparoscopy is an evolving
technique, which can offer significant advantages to both patient and surgeon in
special situations. Standard laparoscopic surgery during pregnancy may be
associated with adverse effects for the mother and fetus secondary to general
anesthesia and the creation of pneumoperitoneum. Surgeons are generally
reluctant to perform laparoscopic surgery during early pregnancy because of
increased intraabdominal pressure with carbon dioxide insufflation, bleeding
from engorged pelvic vasculature, potential for trauma to the uterus, and the
need for general anesthesia. With careful patient selection and attention to
proper technique, gasless laparoscopy under regional anesthesia is a safe and
viable alternative to conventional CO2 laparoscopy.
|
|
|
Abdominal lift |
The use of conventional instrumentation and open ports could improve the ease of surgery and greatly facilitates techniques such as endosuturing. For those patients with a contraindication, or a fear of general anesthesia, gasless laparoscopy under a regional anesthetic is a reasonable alternative.
In some cases significant disadvantages for the surgeon (increased technical difficulty, poorer visualization, and longer operative times) and patient (greater postoperative pain and nausea) were seen with the gasless system.
Diagnostic gasless laparoscopy is a novel technique that uses a small laparoscope to visualize the peritoneal cavity under local anesthesia even at the bedside. This technique may allow rapid and reliable diagnosis of peritoneal penetration, and therefore determine the need for further surgery, without transport to the operating room, general anesthesia or hospital admission.
This differs from traditional exploratory laparoscopy in two ways. First it does not require insufflation of CO2 to distend the peritoneal cavity. Pneumoperitoneum has the advantage of providing a large operating space for complex laparoscopic procedures, but is not needed in the limited, simple application. Instead, manual traction, or suspension by a rigid frame is used to lift the abdominal wall as the surgeon inspects or operates in the cavity. Without the need for pneumoperitoneum, the technique can be performed without general anesthesia. The use of a small port allows insertion to be performed under local anesthetic with conscious sedation in any care setting. For more complex procedures only the insufflation can be avoided and than it is questionable the value and safety of this method.
[ back to top ]
Hand port
The tactility of
open surgery in a closed environment.
This brings something new to laparoscopic
surgery - the sense of touch. Hand-Assisted Laparoscopic Surgery (HALS) is a
less invasive technique for complex abdominal procedures, combines the clinical
and visual benefits of laparoscopy with the tactility and control of open
surgery.

For a wide range of complex surgeries, from colon resection and nephrectomy to gastric resection, this is the alternative to open surgery for many abdominal procedures. Often the diseased tissue needs to be removed trough a larger incision than the ports would provide (colectomy). It would seem plausible to begin with this incision and reach in with one hand and assist the dissection of pathology.
 |
 |
|
|
Hand inside and tissue outside |
||
The advantages are numerous, restoring the direct tissue contact, tactile feedback, instills confidence for beginners, takes advantage of better visualization and speeds up the procedure. The procedure begins as a standard laparoscopic one, than identifies the proposed site of the incision. An elastic, inflatable double ring is placed to preserve the pneumo-peritoneum. The surgeon reaches trough a valve with long gloved hand and directly manipulates the tissue. The other hand is using laparoscopic instruments, viewing all this on the video display.
[ back to top ]
Hand Instrumentation
For minimal
access surgery special instrumentation is needed for the remote and closed
surgical environment. The instruments pivot about at the access point�s fulcrum
with the instrument jaws located within the closed environment, the handle
external to it, and the shaft between them partly in and partly out of the
patient.
Laparoscopic instrumentation ranges from 10-50 cm in length (most commonly 30
cm), depending on the distance of target tissue from the point of access. They
can be disposable (single-use, which are not safe for resterilization), reusable
(on a long-term basis), or "re-sposable" which involve features of both
disposable and reusable instruments.
[ back to top ]
Disposable
Primarily composed of synthetic materials, disposable instruments consist of a unitized construction without replaceable components. Typically, they are not as finely crafted as reusable instruments. Although designed as single-use devices, in certain practice situations they may, in fact, be reused because of economic considerations. The instruments� integrity and function deteriorate more rapidly than their reusable counterparts, and reliable re-sterilization can pose increased risk to the patient and liability exposure to the surgeon. Most notably disposable scissors are excellent when first used; however, afterwards they rapidly deteriorate in cutting ability.
[ back to top ]
Resposable
To accommodate the mounting economic pressure on instrument manufacturers, reusable disposables "re-sposables" have come on the market, enabling a limited number of reuses. Resposable instruments can be resterilized safely a limited number of times, as determined by the manufacturer.
[ back to top ]
Reusable
Instruments in this category involve components mainly composed of medical grade stainless steel, and where suitable, incorporate durable synthetic components (such as for the handle or outer shaft).
 |
| Take apart |
The
take-apart construction not only facilitates cleaning and resterilization, it
enables exchanging of worn or damaged components (typically the jaws). This
design combines reusable and resposable features, thus making these instruments
both high in quality, durability, and moderate in cost. Various instrument tips
(e.g., scissors, graspers, needle holder) and handles can also be exchanged in
this category of instrument, which enable considerable customization of features
based on surgeon preference.
Classic reusable instruments are unitized in construction and are composed of
medical grade stainless steel. This category can be re-sterilized repeatedly
without limitation, and repairs involve shipping the entire instrument for
service (e.g. re-sharpening scissors, repairing locks, etc.). While normally the
most costly of instrument categories, their quality of construction and
durability offset the initial expense.
[ back to top ]
Handle types - ergonomic considerations
The handle serves as the instrument portion of the surgeon-instrument interface, and incorporates features of control, safety, and comfort. The instrument handle should readily fit into the surgeon�s hand; facilitate navigation, as well as operation of the tips. A seamless fit would allow the surgeon to concentrate on the task, and provide enough feedback for eye-hand coordination. Much of current handle design was handed down with little change from designs of ancient times for everyday tools and classical open surgical instruments. Examples include the Roman ring scissors handles with fingers, found in most scissors and graspers.
 |
 |
|
| Roman scissors handle with lock mechanism | ||
Precisely
measured closing and opening control makes this design suitable for delicate and
critical work. This arrangement however is limited to lower manual exertion
power, limited rotational capability, and locks the fingers and hand into a
fixed position.
In laparoscopy, the long instruments are less efficient than those used in open
surgery for operating the instrument. The "numb thumb" syndrome results from
excessive flexing and lateral pressure from the thumb on the ring of the handle.
Later rotability of the instrument shaft was incorporated to improve function
and lessen the likelihood of hand injury to the surgeon.

The traditional in-line arrangement of handle, pivot point, and tip works well when a task performed in a downward direction. The early endoscopic instruments originated from deep cavity work such as gynecologic surgery where an in-line handle would have blocked the surgeon�s view, thus the pistol grip proved to be more practical. This arrangement enables the height of the operating table to be at a height similar to open surgery, while the direction of work is still downward.
 |
 |
The
elevated patient position facilitates a pistol grip if the instrument is
approaching tissues in a sagittal direction. The original idea of this design
was to position the handle and hand out of the surgeon�s visual path when
working in a deep cavity. With or without Roman rings, this will lock the hand
into a limited rotation range. If the procedure requires frequent and extensive
rotation this design is not the optimal choice.
Broadening the inner surface of the rings could more widely distribute contact
with the surgeon�s fingers and reduce the pressure on the digital nerves. This
feature was incorporated into newer instrument designs. Another approach to
increase surgeon comfort with instrumentation involved determining a strategy
for optimal port positioning to eliminate the need for excessive lateral
pressure on the instrument.
|
|
|
Heavy-duty ergonomic scissors handle |
[ back to top ]
Safety
Having the
handle slip out of the surgeon�s grip can have a disastrous effect on the
patient. However, it is rare for an instrument to puncture or lacerate tissues;
rather it typically falls downward, causing the tip to pivot tip upwards.
Handles that have ratchets can malfunction; it can fail to lock, get frozen in a
locked position, or function crudely when activating or deactivating resulting
in jarring the tissues.
[ back to top ]
Straight, coaxial
Straight
handles that are in line with the pivot point and jaw is known as coaxial. The
handle profile is cylindrical and ergonomic.
|
|
|
Traditional and ergonomic handle |
[ back to top ]
Stem
Length: from 5-50 cm, depending on the needed reach. From the stubby hand-port to the long morbid obesity instruments. Standard instruments range from 34 to 37 cm long., depending on the manufacturer. This length can be used to perform most surgical procedures. Shorter instruments (18 to 25 cm) are adapted for cervical and pediatric surgery. Certain procedures for adults can also be performed with these shorter instruments (gallbladder, anti-reflux), but their use leads to a change in port positions and an adaptation of the operating technique. 45 cm instruments: these particularly long instruments have been adapted for procedures on obese or very tall patients. However, their use is becoming increasingly common due to the rise in procedures being performed on obese patient.
 |
| Different instrument lengths |
[ back to top ]
Diameter
The diameter of laparoscopic instruments ranges from 1.8 to 12 mm. The early instruments had 5-10 mm shaft diameter to which the 1.8, 3, 12 mm was added. These diameters provide instruments of varied degrees of rigidity and are adapted for different situations. The longer and thinner the instruments are, the more flexible they are. The thinnest instruments exist only in shorter lengths and certain instrument types are not available.
|
|
|
10 mm, 5mm, 3 mm, 2 mm diameters |
These
instruments have been designed to offer a full range of surgical functions
(i.e.: clamping, grasping, dissecting and cutting, suturing). Thus the tips of
laparoscopic instruments reflect those found in open surgery. Ports that accept
these instruments has to have a slightly grater inner diameter, and their outer
diameter is the sum of the working channel and 2x the wall thickness.
Diameters of 3 to 3.5 mm: they permit smaller incisions in routinely performed
laparoscopic procedures (gallbladder, anti-reflux) or more occasional ones
(endocrine, cervical procedures). However, they are more fragile and have less
shaft rigidity than the 5 mm versions. No bipolar graspers adapted to these
diameters were available.
Diameters of 5 mm: this is the most common diameter for laparoscopic
instruments, most of which are available in this size (i.e.; all types of
graspers, scissors, hooks, bipolar graspers and articulated or angulated
instruments).
Diameters of 10 to 12 mm: apart from the endoscope, most 12 mm instruments are
used for either retraction or exposure, or contain an integrated mechanism (clip
applier, linear stapler, etc.).
[ back to top ]
Degrees of freedom
Most
laparoscopic instruments, i.e. graspers and scissors, have basic opening and
closing functions. Many instruments manufactured during the past few years are
able to rotate 360 degrees, which increases the degrees of freedom of movement
of the instrument. However, many of these instruments are designed to prevent
rotation when the instrument is tightly closed (e.g.; during tissue clamping).
This may facilitate tissue retraction but can be a disadvantage if the surgeon
wishes to rotate the grasped tissue.
A certain number of instruments offer angulations at their tip, in addition to
the usual 4 degrees of freedom. These instruments are used to avoid obstacles
and for lateral grasping when the instrument is placed outside of the visual
field. Angulation features are available both for reusable and disposable
instruments. However, the complex mechanisms of such instruments make
sterilization very difficult, so manufacturers tend to offer a larger range of
disposable versions of these instruments.
The articulation seems to play an important role in case of robotic suturing
where it facilitates suturing and the jaw angle of attack to tissue
[ back to top ]
Jaws
Laparoscopic instrument tip design mirrors those of the open surgical armament, although there are specific designs that are characteristic of the minimally invasive surgery.
 |
 |
|
| Secure, atraumatic grasping used for gentle grasping of the common bile duct during cannulation | ||
|
|
|
Needle
driver - secure hard grasping of needle. |
 |
| 5 mm curved assisting grasper, Babcock, right angle dissector |
 |
| Bowel grasper |
Larger mass of friable tissue cannot be grasped with small jaw/footprint instruments. It would tear the tissue. A larger jawed instrument is needed such as the bowel grasper to handle the small bowel.
[ back to top ]
Scissors
Laparoscopic scissors are borrowed from the open armament with the exception of special purpose such as the hook scissors.
 |
 |
|
| Hook scissors | ||
 |
|
Straight, curved, hook, biopsy scissors. Note the burn marks on the straight scissors blade. They result from monopolar coagulation. Although it is a common technique, it will shorten the scissors usefulness, the blade becomes dull useless for regular cutting. Undulating blade: 10 mm sure grip scissor blade profile used for cutting tough tissues. The undulation traps the tissue and holds while being cut. |
 |
| Undulating Blade |
[ back to top ]
Dedicated suturing instrumentation
Suturing instrumentation design is different from the traditional endoscopic instruments (e.g. graspers) since they must meet special requirements. Suturing is a two-handed task, with the non-dominant hand holding an assisting grasper and the dominant hand holding the needle driver. Each instrument is designed to perform their specific tasks.
 |
 |
The needle driver's role is primarily to handle the needle and suture material (including knotting) while having adequate facility to handle the tissue to a certain extent. Handles are to be cylindrical and straight for finger rotation.
 |
|
Common length is 30 cm |
Although the handle and stems are identical for both instruments, the jaws differ significantly since they are designed for different functions.
Therefore, the tips are short and powerfully leveraged, with maximum grasping power; they have a slight curve with a distinct point to facilitate the suture looping during knot tying, and delicate tissue and suture pick up from a wet tissue surface.

The assisting grasper's narrow jaws are aggressively curved and pointed for maximum grasping capability in all directions. The assisting grasper's main function is to grasp and hold the tissues as well as handle the suture material and assist in knot tying. The assisting grasper should be able to hold the needle for left-handed suturing if the situation requires it. The suturing process requires both instruments to be rotated frequently and thus the handle of the instrument should be rounded to facilitate this rotation.
 |
| Micro-laparoscopy suturing set |
A lock mechanism can be built into the handle that allows the surgeon to lock the needle into a preferred position during needle driving. This lock can be useful for experienced users but it can also impede progress during the initial stages of learning. This lock also must be intuitive, unobtrusive, and must not distract during suturing.
[ back to top ]
Suture material
Suture materials are generally composed of a needle with the thread swaged on its end. The needle should be grasped by the needle driver about 1/2 to 2/3 of its distance from the tip, depending on its curvature, and is used to penetrate the tissues to be approximated. The thread follows in the channel cut by the needle, and the tissue edges are kept together by means of tying a knot.
 |
 |
|
| Atraumatic suture material | ||
The
traditional suture is threaded through the eyelet of a needle and it was in use
until the 1860�s. The patent by Ms. Murphy laid the foundation for the
atraumatic suture later produced by the Davis & Geck Company. The eyelet
required the suture to be doubled up and on passing through tissues, cutting a
larger channel than the swaged suture.
Although
there are easier mechanical means of approximating tissue edges as well as aids
for knotting, manually executed instrument suturing and knotting is still an
essential and fundamental skill. Laparoscopic suturing and knotting can be
applied to vastly different types of tissues, operative sites, and degrees of
access.
The
selection of both the needle and the thread combination has to be adapted to the
particular tissue, can make suturing and knotting easier or more difficult. In
regards to the needle, aside from wire strength and sharpness, there are two
other important characteristics - that is visibility, and needle
shape/curvature.
[ back to top ]
Needles and sutures
The early pioneers in this field used straight needles because of their inability to pass curved needles through the ports. The ski needle was next designed, which provided the ease of passing through the port with an added curvature at the tip for suturing ease and tissue pick up. However, when the needle is sunken into the tissue the straight end gives no indication of the direction in which the tip is pointing. The preference of experienced surgeons, however, gravitated back toward classic curved 1/2 circle needles because of the familiar and intuitive supinating and pronating movements involved. The ideal shape perhaps is the dual curve needle, where both the tip and the end curved, "boat shape". The larger needles are either passed directly through the abdominal wall or port site incisions.
 |
| 1/2 circle, 3/8 circle, and the boat-shaped needles |
[ back to top ]
Needle tips
Blunt tip:
there are many kinds of tips which can be found on needles. They are optimized
for particular types of tissue penetration. Blunt tip used in readily bleeding
tissues like the liver. The blunt tip pushes the tissue apart along the weak or
connective tissues avoiding the microvasculature.

Cutting needle: this type of tip has a knife or spear-like point. It is used to suture through tough tissues and is likely to cut into blood vessels. It causes more tissue damage in general, but it is practical to have on hand for use on resistant tissues and subcutaneous suturing (example: corneal spatula needle).
Taper point:
this needle tip is ideal for most vascular repairs. It leaves a minimal defect
in its track. This needle has a smooth, round tip and a sharp point. It will
pass readily through delicate tissues while causing a minimum of trauma to
surrounding tissues.
The tip is
identified as a tapering ratio; i.e., between the full needle diameter and the
length of from the tip to the portion of the needle at its full diameter, e.g.,
10:1, 3:1. The longer the tapering ratio, the easier it is to pass the needle
through tissues.
Taper cutting tip is favored in microvascular surgery and wherever hemostatic anastomosis must be created, or when a delicate needle is needed for driving through tougher tissues. It incorporates a minute cutting edge at a small section of the needle tip.

[ back to top ]
Thread
Sutures are designed to help the healing of the body by closely opposing the two sides of a wound to minimize scar formation or to prevent leaking blood, like in vessels. They have to comply with several requirements to be effective. They must be strong (so they do not break), non-toxic and hypoallergenic (to avoid adverse reactions in the body), and flexible (so they can be tied and knotted easily). In addition, they must lack the so called "wick effect", which means that sutures must not allow fluids to penetrate the body through them from outside, what could easily cause infections.
[ back to top ]
Absorbable and non-absorbable sutures
Absorbable sutures
are made of materials which are metabolized inside the body after around three
weeks, and then disappear. They are used therefore in many of the inner tissues
of the body. In most cases, three weeks is sufficient for the wound to close
firmly. The suture is not needed any more, and the fact that it disappears is an
advantage, as there is no foreign material left inside the body. Absorbable
sutures were originally made of the
intestines of
sheep, the so called catgut. The manufacturing process was similar to that of
natural musical strings for violins and guitars, and also of natural strings for
tennis racquets. Today, natural absorbable sutures are made primarily of bovine
intestine. However, the major part of the absorbable sutures used are now made
of synthetic fibers, like polyglycolic acid.
Non-absorbable sutures are made of materials
which are not metabolized by the body, and are used therefore either on skin
wound closure, where the sutures can be removed after a few weeks, or in some
inner tissues in which absorbable sutures are not adequate. This is the case,
for example, in the heart and in blood vessels, whose rhythmic movement requires
a suture which stays longer than three weeks, to give the wound enough time to
close. Other organs, like the bladder, contain fluids, which make absorbable
sutures disappear in only a few days, too early for the wound to heal.
There are several materials used for
non-absorbable sutures. The most common is a natural fiber, the
silk, which
undergoes a special manufacturing process to make it adequate for its use in
surgery. Other absorbable sutures are made of artificial fibers, like
polyester or
nylon. Finally,
there are also
metal wires used
in
bone surgery
because of their strength and in some other tissues because of the metal's
outstanding tolerance by the body.
[ back to top ]
Traumatic and atraumatic sutures
Traumatic sutures
are those which are supplied to the hospital plain, i.e., the suture thread with
nothing else. The needle required to use the suture is a separate item. The
suture must be thread into the eyelet of a surgical needle. This causes the
thread to double up, enlarging the channel cut in the tissue.
Atraumatic
sutures include a needle swaged on each thread.
The advantages of having the needle mounted on the suture are several. The
surgeons or the nurses do not have to spend time threading the suture on the
needle. More important, yet, is the fact that needle and thread form a single,
even body. In case of the traumatic suture, the thread comes out of the needle's
hole on both sides. When passing through the tissues, this type of suture rips
to a certain extent the tissue. With the atraumatic sutures this does not
happen. They produce no excess trauma
to the tissue, hence the name "atraumatic". Because of these advantages, the
atraumatic sutures are today very widely used. There are several shapes of
atraumatic needles, like straight, half curved, one-third curved, and others.
The body of the needle is available also in different makes, like circular, with
edge on the outer side, with edge on the inner side, and others.
[ back to top ]
Sizes of sutures
The sutures
were originally manufactured in #1 to #6 ranges (to give an idea about these
numbers, a #4 suture would be more or less the diameter of a tennis racquet
string). The manufacturing techniques, derived at the beginning from the
production of musical strings, did not allow thinner diameters. As the
procedures improved, #0 was added to the suture diameters, and later, thinner
and thinner threads were manufactured, which were identified as #2/0 to #6/0.
This last diameter, thinner than a human hair, was used during the last decades
primarily for eye surgery. Now, there are even thinner sutures, down to #11/0.
Atraumatic needles are manufactured in most of the shapes for all these sizes.
For most
repairs 2/0, 3/0, 4/0 sutures are used. Suture material thicker than this will
be hard to suture with, hard to tie knots and it also takes longer for the
suturing material to dissolve. Smaller thicknesses than 2/0 or 3/0 or 4/0 are
too fine and dissolve too quickly as well as breaking more easily.
The
important characteristics of thread selection are visibility, pliability, and
knot holding security. The 2/0 silk has good pliability and is easy to work with
laparoscopically. The absorbable polyglactin or lactomer suture material is also
easy to handle, however its visibility is significantly reduced because of its
pastel violet (lavender) color. Polyester, polyglycolic acid, polyglyconate
sutures have similar visibility disadvantages and they are likely to be stained
on contact with blood. The ideal suture material should have vibrant,
fluorescent (yellow, green, pink, etc.) colors to provide easy visibility, like
the ePTFE which is fluorescent white and resistant to staining.
 |
 |
|
| Colored sutures and ePFTE suture | ||
Monofilament polypropylene, polydioxanone, and nylon are strong materials, although their stiffness or excessive memory can render them frustrating to use, especially for the novice. The knot holding ability of braided materials hold a square knot securely but it is unsuitable for an extracorporeal slip knot. For this reason, a monofilament material is more suitable because of its slippery surface. If an intracorporeal square knot is tied with these sutures one must remember to throw 3-4 hitches to provide adequate knot holding security.
[ back to top ]
Suture length
The next
consideration is suture length. The suture can be obtained on a spool or in
pre-cut, pre-packaged lengths. Pre-cut is by far the optimal way to buy it as
the spool must be kept sterile and protected from the environmental influences
which may weaken the suture material. The ideal length is 27 inches for open
surgery and 7/8 inches for laparoscopic use, 4-5 inches for microsurgery. Longer
suturing lengths will tangle too much and it is more difficult to pull long
lengths through the tissue. As a concern for suture economy and simplicity, the
knots in laparoscopic application should be tied to the end as much as possible.
[ back to top ]
Alternatives to sutures
Surgical
staplers, clip appliers are popular amongst surgeons, which is an alternative to
the classical sutures in some of their applications. It consists of a stapler,
similar to those used in the office, which fixes either individual or a row of
staples into the wounds, holding both sides together. It is used both for the
skin and for inner tissues. Single, linear, circular types are available. The
staples are made of metal and the tolerance by the body is high; in some cases
the staples are left inside the body. When used for
skin wounds, the
staples are removed once the wound is closed. The advantage of this system is
that it is faster to use than the sutures, especially when there are large
wounds or several wounds to be closed.