 |
 |
|
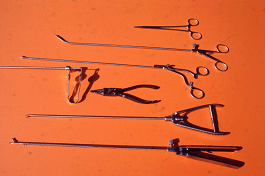
| Trainer box and instruments | ||
[ back to top ]
Practicals
General background - training for laparoscopic surgery
Different
from traditional open surgery, specific problems that are related to
video-visual perception and psychomotor skills must be identified and overcome.
Many of the required skills are not used in conventional open surgery. The early
recognition that the rate of complications correlates with the number of
procedures done by the surgeon has highlighted the need for formal training in
laparoscopic surgery. No consensus has been reached, however, on what
constitutes adequate training. This chapter discusses general training
methods and goals.
Training in
laparoscopic surgery includes didactic instruction, virtual reality exercises,
in vitro training in simulators, and operating on animals and patients. Each
kind of training has its merits and limitations, which must be considered when
embarking on a training program. Also, in some centers, the approach to training
for surgical residents who need an overview of laparoscopic procedures and
techniques differs slightly from training for experienced surgeons wishing to
develop a specific laparoscopic practice.
Some
evidence indicates that it may not be necessary for specialized surgeons to
learn how to perform basic procedures (e.g., the laparoscopic cholecystectomy)
before learning how to perform a more advanced procedure. It has been shown that
the ability to perform a laparoscopic cholecystectomy does not confer the level
of skill for more advanced procedures, such as the colon resection and also that
colon resection can be taught without prior experience of laparoscopic
cholecystectomy.
Although
specialized surgeons can be taught to perform advanced procedures without
experience of the more basic ones, there is a concern that the complication
rates (shown to be related to the total number of procedures done will be higher
for these surgeons when compared with surgeons with a greater experience of
laparoscopic surgery. It is recommended that all surgeons be trained in simpler
laparoscopic procedures before performing more difficult ones.
[ back to top ]
Didactic instruction
Didactic
instruction occurs in various settings: during training courses, postgraduate
courses, and meetings of surgical societies. The two components are general
instruction and specific procedural training.
The general
component should cover familiarization with the instruments, especially the
principles of using and troubleshooting the imaging system; principles of
operative techniques, especially trocar placement; exposure of the operating
field; and principles of intracorporeal suturing. This instruction is necessary
before specific procedures are attempted, especially procedures requiring the
use of two hands and intracorporeal suturing. Training surgical residents to
perform specific procedures should include a brief explanation of the key steps
of the procedure and showing video clips.
The key
steps in the procedure should be pointed out while the proper instruments are
discussed (e.g., electrosurgery, dissectors, and graspers). Videotapes should be
available for students to review at their convenience. The major complications
and their avoidance should be covered. Videotapes of complications or "near
complications" have a great impact.
[ back to top ]
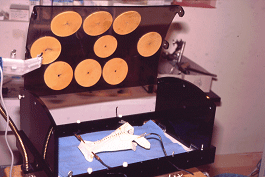
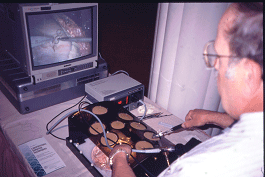
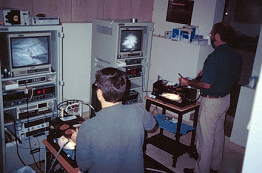
In vitro training
The first step is practice in a trainer box with ports for instruments and the scope. Many trainers are commercially available, ranging in design from plastic boxes with holes for trocar placement to those with a small video camera built in, so that they may be connected directly to a TV monitor without having to borrow a camera and light source from the operating room.
|
|
|
|
| Trainer box and instruments | ||
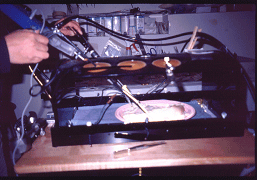
One should practice on the same quality optical-video-monitor setup as used in the operating room. This creates a true and correct eye-hand coordination. In vitro training can be a valuable precursor to operating in live animals and humans in several areas. First, it is useful for establishing the mental framework and steps of the procedures difficult parts. Fresh animal tissue can create surprisingly lifelike models. Team interaction between surgeon, camera operator, and assistant can be practiced, the best time to learn how to use the camera.
 |
 |
|
| Fresh animal tissue model. The pelvi-trainer is ideal practice equipment | ||
This setup is well suited for intra corporeal suturing skills and live animal practice to teach operative surgery. Most of the students can acquire the idea of placing a suture and tying a knot in about 2-4 hours. Progress beyond that varies between surgeons, and influenced by the frequency of practice. An experienced/professional instructor should do the teaching because many steps (e.g., mounting the needle in the needle holder, laying out the suture, and best use of the camera) are not intuitive and differ from those in open surgery.
[ back to top ]
Teaching by example
The exercises and their steps are either shown on video clips or in person by the instructor. The personal tutorial is the most effective and stimulating teaching, challenging the students to imitate the instructor which is the most efficient teaching method. Goals during the suturing should be to complete the prescribed, personally demonstrated knots within the standard times.
[ back to top ]
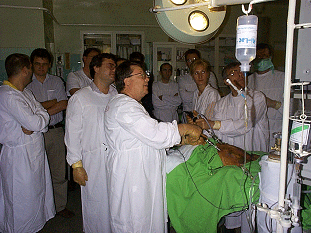
Use of animals for training
If live
animals are not available for training, dissecting technique and simulated
operations could be performed on fresh slaughterhouse organs in an in vitro
trainer. However, operating on live pigs (female Vietnamese; average weight up
to 30 kg) is extremely useful for developing skills, trying out new procedures,
and gaining experience with new and unfamiliar instruments. Approval must be
obtained from the institution’s animal use committee.
In general,
the pig is a good model for acquiring skills such as trocar placement, exposure,
and the appropriate use of gravity, traction, and countertraction. Other
important skills, such as two-handed dissection, intracorporeal suturing, use of
mechanical stapling and anastomosis devices, and dealing with complications such
as bleeding and bowel perforation can also be learned. Perhaps not surprising,
the most frequent cause of animal deaths is hemorrhage.
[ back to top ]
Training for specific procedures
in the pig
The pig is
a good model for the surgeon to practice dissecting the gallbladder from the
liver bed during cholecystectomy, but no animal really mimics the anatomy of
Calot’s triangle enough to be a good model for the human operation. This
limitation has to be borne in mind when transferring experience gained in pigs
to humans, because the most serious technical complications of cholecystectomy
occur from mistakes during the dissection of Calot’s triangle Furthermore, the
cystic duct of the pig is too small for transcystic common bile duct
exploration. Anatomic differences also make the pig a poor model for
appendectomy, right hemicolectomy, and hysterectomy.
 |
| Porcine model |
The pig is
an excellent model for operations on the upper gastrointestinal tract for
antireflux procedures, vagotomy, Heller cardiomyotomy, pyloroplasty, gastrectomy,
gastrostomy, jejunostomy, cholecystojejunostomy, and gastrojejunostomy.
Experience in these operations in pigs is relevant to the same operations in
humans.
The pig is
also a good model for laparoscopic assisted anterior resection of the colon,
although the absence of fat in the mesentery makes the mesenteric dissection
easier in pigs than in humans.
The pig is
also a reasonable model for laparoscopic transperitoneal hernia repair. The
anatomy is not too dissimilar; the main difference is that the pig has two
inferior epigastric arteries. The procedure itself can be easily performed in
pigs. Preperitoneal hernia repairs and other preperitoneal procedures are more
difficult to simulate in pigs because their peritoneum is thinner than in
humans. Therefore, it has a tendency to tear, which leads to loss of the
pneumopreperitoneum.
Splenectomy
may be performed in pigs, but the pig spleen has a different shape and is more
mobile than the human spleen.
[ back to top ]
Limitations of training in the
animal laboratory
Three
students per pig, with students rotating as surgeon, camera operator, and
assistant, is a good arrangement at the start. It is ideal if the three students
come from the same institution and plan to operate as a team after completing
the course. One instructor is assigned to each group of three students. Over the
period of the course, the students should be exposed to different instructors
and thus to different operating styles and techniques.
The major
limitation of animal training courses is that students cannot really gain enough
experience to perform the more difficult operations, such as fundoplication, on
humans. Even after a five-days course on several procedure (laparoscopic
cholecystectomy, appendectomy, hernioplasty), some students remain unable to
complete the procedure satisfactorily as judged by supervisors. No data are
available to indicate how much experience is truly required to bring performance
to an acceptable threshold. In an experimental model, we have found considerable
variation in the surgical skills of individual laparoscopic surgeons. There is a
growing belief that permanent training facilities are needed where surgeons can
train regularly until they reach a point where they are fully prepared to
perform technically difficult procedures in humans. A better understanding of
the nature of surgical skills and how to measure them is also needed.
[ back to top ]
The role of technology in training
New
technology perhaps promises to improve the effectiveness of training programs
and the capabilities of surgeons in the operating room. For example, virtual
reality trainers may facilitate the objective assessment and initial training of
laparoscopic surgeons but will not replace animal models.
 |
 |
|
| Traditional laparoscopy and robotic practice | ||
Manufacturers are attempting to produce devices (most of which are still experimental) that simplify more difficult tasks, such as suturing and knotting. If successful, this should allow more surgeons with reduced skill to perform advanced laparoscopic procedures. Although after much investment there is still no satisfactory and cost effective substitute is found.
[ back to top ]
Suturing, tying knots
Principles
Traditionally surgeons are in a hurry. The handicap of laparoscopic approach and suturing/knotting generates a great deal of frustration and fumbling, particularly in the novice. As tissues are magnified and instruments moved, it is very difficult to visually trace the trajectory of the two instrument tips, particularly when these movements are fast and erratic. Even for experienced surgeons movements must be slowed down in order to regain control and restore precision. Magnification and reduction of the operative field size require a proportionate reduction of movement speed and range (path) in order to regain eye-hand coordination and overall control. The use of long-stemmed instruments with distant fulcrums adds to the challenge. The best remedy to any situation that is "out of control" is to slow down in proportion to the degree of magnification and to focus one's attention exclusively on the task at hand. The greater the magnification and/or the more difficult the port position setup, the more one must slow down when suturing tissue edges together or tying an intracorporeal knot. Slowed movements not only permit recognition of impending error and appropriate correction of action, it also provides good control. This, in turn, builds confidence.
[ back to top ]
Challenges and solutions
The challenge of intracorporeal suturing and knotting centers around four areas: 1. visual perception, 2. eye-hand coordination or psychomotor skill, 3. setup, and 4. the mental framework.
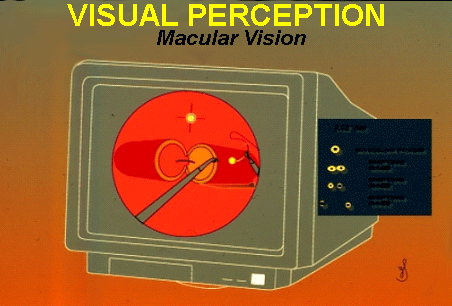
Visual
perception
The surgeon's normal visual perception
is altered by viewing the operative field through a closed-circuit video system
which is based on the 70°-90° angle optical view of the most common
laparoscopes, a poor comparison to the unaided conventional overhead view or
even to the brilliant 3D image seen trough the surgical microscope.
 |
| Magnification |
A flat, two-dimensional image requires strategies and visual memory to overcome the lack of depth perception; currently available 3-D systems make little impact on improving the surgeon’s performance. More important is using a system that can provide a high degree of visual clarity, sharpness and illumination. The surgeon would be best served by making certain that an optimal image is preserved throughout the procedure.
 |
| Good quality image |
This includes: 1. tuning the video system to its optimal level, including correct color rendition and contrast; 2. maintaining sharp focus; 3. centering the action on the monitor, 4. keeping the optical components clean, 5. wearing recently checked corrective lenses if needed. These factors are of great significance although they are often neglected. With substantial practice and experience, visual memory develops; the image becomes more informative to the surgeon, especially with regard to the different spatial relationships, references points, and the altered view of anatomy.
[ back to top ]
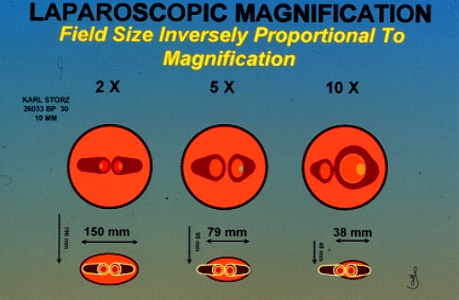
Eye-hand coordination
This
challenge greatly depends on the magnification. Optical magnification is
determined by the laparoscope and additional modification by the video display.
The final magnification is controlled by 1. the distance from the scope
objective lens to the target tissue; 2. the setting of the zoom lens
(ring) on the coupler between the ocular and the CCD chip, and 3. partly
on the length of laparoscopic instruments and their relative pivot points.
|
|
|
Laparoscopic magnification |
The instrument length and its pivot point are significant in influencing the excursion if the surgeons hand and the tip. The longer the instrument the further is the pivot point and causing uncertainty of the instrument tip movement which is critical. Although with practice the particulars of movements become automatic, muscle memory develops. The practiced laparoscopist concentrates on the visual clues on the displays and although initially aware of the hand movement, soon transcends it. Focused mental concentration takes over and will based on visual clues will direct the surgical movements. The physiology of skilled task performance is complex but studying it helps to understand the teaching and learning of it.
Visual tracking is an important skill component as well as the controlled versus ballistic movements. As the surgeon makes a small random hand movement (action) causing the instrument tip to move (reaction), visually tracking it, assessing its position and making an other action movement adjusting the path of instrument tip reaction. This is like trial and error process and after some practice one gets a feel for the correct hand movements resulting in the desired tip trajectory, in other words one mostly transcends the human hand/instrument interface, the direction and amplitude of action movements. Solutions: 1. coaxial line up, 2. triad port positions, and 3. ideal directions.
[ back to top ]
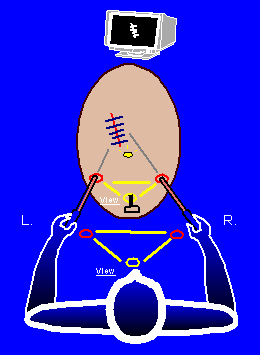
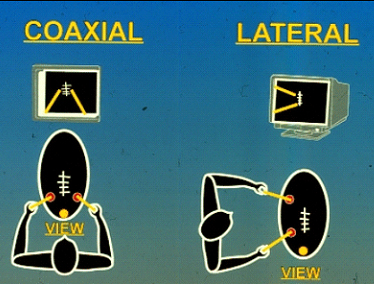
Coaxial alignment
Coaxial
alignment refers to the following five components being arranged along a
straight line:
(1)
The position of the surgeon,
(2)
The viewing port (laparoscope and camera),
(3)
The instrument ports,
(4)
Target tissue,
(5)
Video monitor.
 |
| Intuitive and translating setups |
This
arrangement provides optimal access to the operative site, and reduces the
stress on the human brain when calculating and translating the relationships of
instrument movements and target tissues. This is the everyday used setup of
common tasks, intuitive and the eye-hand coordination is familiar.
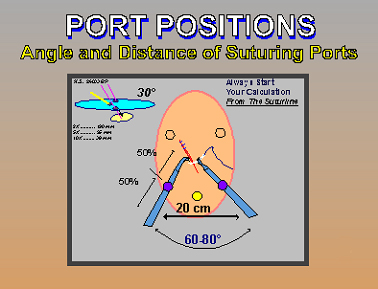
Ideally,
the video system should include a high resolution 19-inch monitor and be viewed
no further than 5-6 feet away. The laparoscope and instrument ports need to be
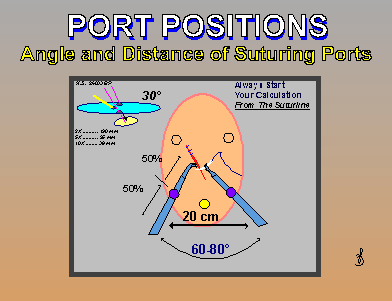
placed in a fashion that duplicates the natural anatomy of the surgeon; that is,
placing the camera in the middle and the suturing ports on either side in
advance of the surgeon's frontal plane, just like the human eyes are in the
middle and the hands on either side. The distance between the suturing ports
should be approximately 20 cm or so. Having the ports closer or further apart
would still enable the surgeon to suture; however, it would be significantly
more difficult.
|
|
|
Instrument setup |
Use of a laparoscope holder, whether mechanical, pneumatic, passive, active or robotic, is desirable, preferably with a zooming device for difficult suturing situations. It will provide a rock solid, steady image that a surgical assistant would be hard pressed to duplicate over a prolonged period of time. Also it will permit the solo surgeon to practice a two handed technique. The zooming device would allow magnification changes, i.e., a close up or panoramic view, as required for particular needs.
|
|
|
Coaxial setup with triad port positions |
[ back to top ]
Triad port positions
Suturing
essentially requires three ports, one for viewing, and one each for the right
and left-hand instruments. The most intuitive arrangements of these ports
consists of the view port being in between the right and the left instrument
ports in a triangular formation, duplicating the human anatomy (i.e., vision or
the eyes in the middle, parallel with the axis of the coaxial line up). When
attempting to suture in a different location, these three ports can be shifted
in unison to the new position. Most target tissues can be approached from the
base position of putting the laparoscope in the umbilicus and having an
assistant position the tissue to be sutured in a favorable location.
|
|
|
Right handed suturing direction |
[ back to top ]
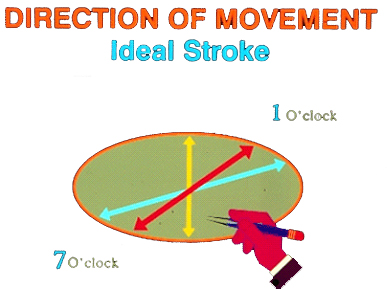
Ideal directions
The ideal
directions for suturing in a magnified surgical
field, again follows pre-established routines from ordinary activities. For the
right handed surgeon the suture line should be in the 11 o'clock to 5 o'clock
position and the stitches placed in the 2 o'clock to 8 o'clock direction. Paper
positioned at this angle facilitates writing in a straight line, parallel to the
top and bottom edges of the paper (or perpendicular to the left and right
edges). In a similar manner, this suture line should be positioned in the same
angle, so that the stitches would be perpendicular to it. For the left-hander,
the suture line should be positioned at a 1 o'clock to 7 o'clock position and
the stitches placed in the 10 o'clock to 4 o'clock direction. Positioning
tissues in this manner, as with any aspect of good setup, facilitates proper
techniques and favorable results.
|
|
|
Finger grip permitting unlimited rotation |
[ back to top ]
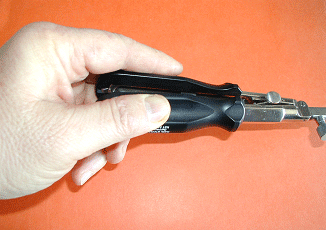
Instrument handling
Instrument rotation
Laparoscopic suturing requires frequent instrument rotation such as the scooping
motion of needle driving and rotating sutures during knot tying. Instruments
with the traditional pistol or angled ring grip are unsuitable for these
techniques since rotation is particularly difficult and awkward. While a highly
skilled surgeon could use such instruments, it is an unnecessary burden that
leads more quickly to surgeon fatigue.
|
|
|
Suturing instruments setup |
[ back to top ]
Instrument position
The
importance of port positioning is not only in providing the proper angle of
access but also a fulcrum for the instruments that is exactly halfway between
the tip and the handle. That is, 50% of the instrument shaft is inside the body
cavity and 50% is outside. This provides a 1:1 ratio of movement between the
handle and tip
[ back to top ]
Choreography of movements
Although
slowing down restores the necessary control and movement precision, it also
increases operating time. This increase will be in proportion to the
magnification and the complexity of the setup. Certain components of suturing
technique involve repetitious movements such as needle driving and knot tying.
These movements can be analyzed, broken down to their most basic components,
then reassembled into the most efficient and intuitive process ("choreography").
Every movement made should flow into the next ("fluency"). This fluent
choreography, coupled with a reduction in movement speed, enables precision
controlled movements and a reduction of operating time. When this choreography
is memorized, it benefits the surgeon when learning a new procedure. It arms him
or her with a technique that is standardized and frees the surgeon to focus on
the variable aspects of the procedure. In doing so, the surgeon can easily
recall and be duplicate the sequence of steps even under stress.
[ back to top ]
Economy of motion
A
complimentary component of movement choreography is the economy of motion, which
will further shorten operating time. Nervous, random, and uncertain movements
need to be eliminated and replaced with deliberate, purposeful maneuvers. Simply
by eliminating the need to correct small mistakes, such as re-grasping tissue
that is let out of the jaws of an instrument, considerable time will be saved.
These movements must be planned in the surgeon's mind and slowly executed
following a mental image, keeping the action as close as possible to the ideal.
Considerable time and effort is required to develop a smooth choreography,
flawless technique and maximum economy of motion but the reward is commensurate.
An individual style can be developed that is effective, efficient, and elegant.
One of the best demonstrations of the economy of motion is during the very
beginning of suturing is loading the needle.
[ back to top ]
Ambidextrous technique
When
suturing in a handicapped surgical setup such as the laparoscopic field, the
surgeon really cannot afford to be dominantly single-handed. Even with the most
careful preplanning and placement of instrument ports, a situation can easily
arise that favors using the non-dominant, (e.g., left-handed) for needle driving
and knot tying. While the tissues might be adjusted to a more favorable position
for right-handed execution, or the surgeon could persist with an awkward
right-handed move can be made, this is likely to cause tissue damage. Further, a
less-than-ideal stitch placement, and/or an awkward looking style may result. To
get maximum potential from laparoscopic surgery, the surgeon is advised to
develop ambidextrous suturing and operative technique.
[ back to top ]
Touch confirmation
In
laparoscopic suturing the spatial location of various objects, the suture, and
tissues in the field are often difficult to judge when relying solely on visual
information from a 2-D image. A simple technique can be employed to enhance
movement accuracy. This consists of touching the targeted structure lightly
(gentle probing) to verify one’s estimation of the actual location. By
practicing the "touch confirmation" technique the surgeon can gain critical
clues to an object's true whereabouts before expending the effort to grasp it.
In the process, actual spatial relationships become apparent and should be
incorporated in the surgeon's visual memory.
With this
information, the surgeon is able to transform a 2-D image into a "virtual 3-D"
image. Touch confirmation is only one component of "virtual 3-D"; it also
involves experienced visual perception as well as logical reasoning. The touch
confirmation technique can result in movements that are remarkably accurate when
coupled with the principles of slowed movements, sequential choreography,
flawless technique, and the economy of motion.
[ back to top ]
Sutures in practice
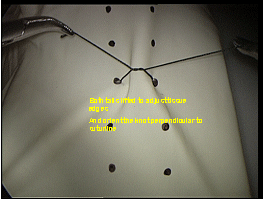
The goal of the courses is to impart the method of adapting the traditional open techniques to laparoscopic setting. However, this transition is not straightforward but can be started by a didactic lecture explaining some of the differences and important technical details. A brief description of the equipment and instruments used during the training sessions should be provided and the use of new or modified instruments also demonstrated. Training should begin with exercises in a simulator (suturing trainer box) using inanimate material. This provides an opportunity to become familiar with the equipment, instrumentation, and the particulars of intracorporeal suturing and knot tying. This can be as simple as transporting beads from one container to another or threading needles trough fixed eyelets.
|
|
|
Latex glove suturing model |
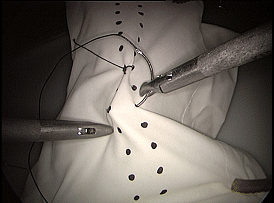
Suturing
exercises begin with suturing a latex glove that have two rows of dots marked
and a cut made through it facilitates the skill acquisition of needle handling,
precision entrance-exit bites, suturing, and the knot tying sequence. It is
particularly important that good technique, such as targeting entrance and exit
points, be practiced early on in training to avoid the development of bad
habits. This is a physically and mentally stressful event, therefore it is
recommended to be well rested and avoid caffeine before.
The
techniques presented during the didactic session and each exercise should be
personally demonstrated by the lecturer to course participants. Ideally, two
residents per trainer setup allow adequate practice time. First, one surgeon
assumes the suturing role while the other provides camera holding and assistance
with positioning the target materials, etc. Each participant should work for
approximately 3-5 minutes to accomplish a specific task, and then rotate roles.
An experienced instructor should be readily on hand to provide guidance if any
questions or difficulty arise.
[ back to top ]
Exercises
In this
initial phase it is important to discuss and practice the vital setup principles
as well as to develop an appreciation for the economy of motion principle,
choreographed movements, and flawless technique involved with suturing and
knotting techniques. It is also necessary to approach these exercises with
relaxed muscles, slowed movements, and tightly focused attention. Further, one
needs to recognize that this is a form of precision technique where finesse
triumphs over brute force.
[ back to top ]
Suture length
The proper
length of suture should be carefully considered and calculated prior to its
introduction into the operative field. Generally, the length of suture to be
inserted into the field should be the minimum length necessary to accomplish the
suturing task (usually no more than 7-8 inches). First, introducing a suture
longer than this would result in thread tangling and thus require its excessive
handling. Repeated manipulations and struggles with a long suture can be quite
time-consuming and frustrating. Second, by inserting ideal length of suture
necessary to accomplish the suturing task, eliminates the need for repeated
process of removing of the used needle and introducing of a new one. By reducing
the suture passage traffic through the ports, the likelihood of losing the
needle in the port or field is reduced. Loosing a needle is reason for major
concern. Third, a complimentary component of this concept involves where to tie
the knot at the thread – it should always be positioned at the most distal
portion of the thread. This is a basic principle in magnified surgery (e.g.
microsurgery) and would be necessary to practice laparoscopically. On the other
hand, by following the habit of open surgery of tying the knot conveniently in
the middle of the thread, the result will be the need to use several sutures for
a given task. Consequentially, the problems associated with heavy traffic of
suture passage through the ports (potential needle loss) as well as unnecessary
time consumption are significant factors. Furthermore, the suture line should be
kept clear of suture tails and those not used as stay sutures should be snipped
reasonably close (3-4 mm) to the knot to minimize visual clutter and maintain a
clean and orderly surgical field.
[ back to top ]
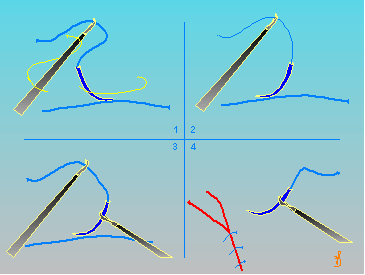
Needle loading and driving
The needles
selected may depend on the size of the ports in use. A 5-mm port can accommodate
straight and ski needles but a 10-12 mm port may be required for strongly curved
needles such as the ½ circle. Care should be taken not to damage the needle tip
during the transit trough the port.
|
|
|
Four steps to load a needle |
To introduce the suture, the thread should be grasped with the assisting instrument 3-4 cm from the end of the needle. By continuing to hold the thread at this point, the needle can be dangled above the tissue surface and slowly lowered so that the tip of the needle touches the tissue. If necessary to adjust the direction in which the needle is pointing, the assisting grasper can be rotated in a manner to make the needle point in the proper direction for suturing.
|
|
|
Grasp the needle at 2/3 of length |
The needle
driver can carefully grasp the needle at 2/3 of length, at the rear and the
surgeon can make small adjustments as needed. If the needle is grasped properly
but is pointing in the wrong direction, its tip can be lightly hooked into the
tissues. By pushing in one direction or another, it can then be pivoted into the
proper position and held by the grasper. The appropriate grasping point on the
needle shaft is approximately 2/3 of its length from the tip of the needle for a
3/8 circle needle, and roughly 1/2 way back for a half circle needle. The tip of
the curved needle driver should be pointing towards the back end of the needle.
Other words: spoon up. Holding the needle perpendicular to its plane by the
needle driver provides the most effective grasp to penetrate into tissues. The
needle should be driven in a course that is perpendicular to the suture line, by
following its curvature to reduce leverage and tissue trauma at these entrance
and exit points.
One should
be pushing the needle against tissue resistance. It is done by initially driving
the needle gently and watching for needle deflection. If the needle deflects to
either side, making a small correction toward the other, the head on resistance
direction will become obvious. In doing so, minimal tissue resistance will be
encountered and needle driving will be a straightforward procedure. Slow
movements enhance a smooth process.
|
|
|
Needle deflection |
Deviations from this seeking the resistance approach leads to a variety of difficulties, frustrations, and wasted time. To correct needle deflection (when the needle flips out of the proper position), the thread can be gently grasped about 1 cm behind the needle end and pulled in a direction to restore the proper position or simply the needle is pushed, pulled to make the needed correction. The surgeon's grip on the needle driver must be loosened somewhat to allow this adjustment, but not excessively or the needle will be dropped altogether.
[ back to top ]
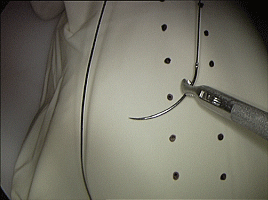
Suture lines
The
appropriate suture line for a given repair can be determined by assessing the
type and length of the defect, type of tissues involved, and their function. The
continuous suture line can be completed more rapidly because it involves far
fewer knots but it is more difficult to accomplish with the same level of
precision than can be obtained with an interrupted suture line. It is prone to
purses stringing and gaps.
Identification of the tissue edges is necessary, as is careful adjustment of the
tension on each suture. One method is the use the assisting grasper to lift the
suture tail, which provides some degree of countertraction during needle
placement.
 |
 |
|
| Continuous and interrupted suture | ||
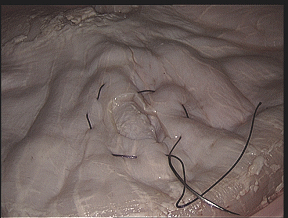
By using the tail of the first stitch to elevate the tissue, with the thread exteriorized and anchored with a hemostat on the surface of the skin, moderate tension is applied to the suture line and the tissues and suture line can be positioned favorably for completion of the repair. Another method is to have the assistant elevate the most recent stitch, or to lock the suture line every few stitches. In the end if any gaps or loose stitches are found, an interrupted stitch can be placed. An interrupted suture line is more conducive to a precise repair and in some cases such as a hand-sewn gastrojejunostomy, use of both types of suture lines is recommended at different aspects of the repair. Structures with lumen repaired with interrupted suture line to prevent stenosis.
[ back to top ]
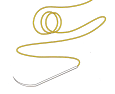
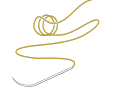
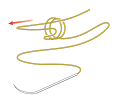
Intracorporeal knotting
Square/slip knot - convertible locking slip knot
The role of
a stitch is to approximate tissue edges. This approximation is usually held by a
secure, non slipping knot. On the other hand, it is sometimes desirable for the
knot to be tied temporarily in non-locking fashion and moved later to its final
position and securely locked. For example, in certain microanastomoses,
especially difficult ones where free access is not possible, it might be
desirable to place the primary stitches without initially approximating the cut
surfaces. This allows the surgeon an opportunity to inspect the stitches for
errors and when satisfied, then approximate the tissue edges and secures the
stitches using the same knot. Another knot can be placed for additional
security, if desired.
Another
application of the convertible slip knot is for use in stay sutures. With the
convertible slip knot, i.e. one that converts interchangeably between a locking
and slipping configuration, considerable time and effort could be saved, a fact
that might prove critical to microsurgical and endoscopic surgery applications.
The method
of tying is similar to the standard square knot using the instrument tying
method, with one exception. In this method the principle of avoiding instrument
crossover during knot tying is applied. The disadvantage is that this requires
more handling; the advantage is a safer, more controllable knotting.
This knot's
unique feature is that it is convertible to a slipping configuration and
re-convertible to a locking configuration. The square knot used here must be
tied precisely as described in the following section, for if it is performed in
a random fashion, random results will be obtained, ie. the knot will not work.
Further, this technique must be mastered so that the procedure is executed
efficiently and flawlessly to maximize on the time and effort saving benefits.
It is this aspect that is crucial to the ease and success of performing
microanastomoses and endoscopic suturing and anastomoses. The method described
is for execution by a right-handed surgeon. Naturally, the steps can be reversed
for left-handed performance. In fact, it is the author's opinion that
ambidexterity is a highly desirable ability. The knot tying procedure is divided
into two parts: (1) tying the square knot (composed of two opposing flat knots)
and (2) converting it to its slipping configuration, relocating the knot, and
reconverting it to its locking configuration.
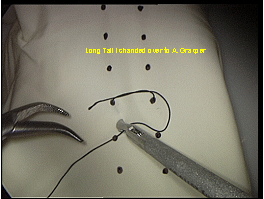
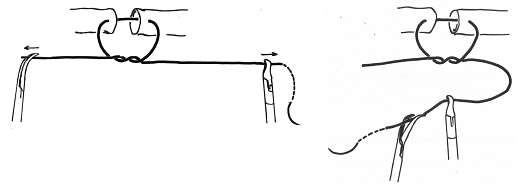
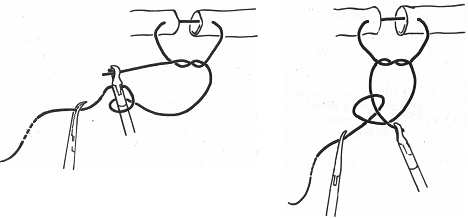
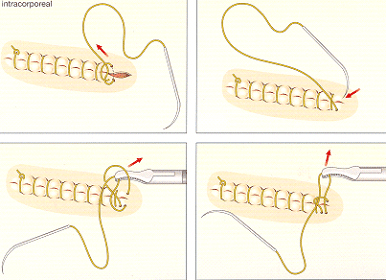
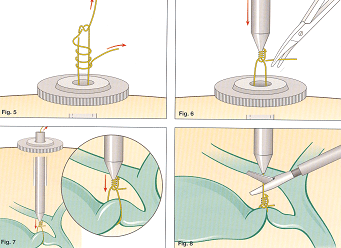
The first flat knot
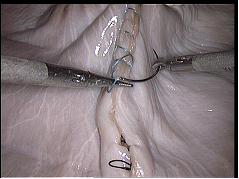
After the needle has made its exit and the thread is pulled through, leaving a short tail, the needle is placed somewhere in or out of the field in a secure location. The long tail is on the left side and the short tail is on the right side.
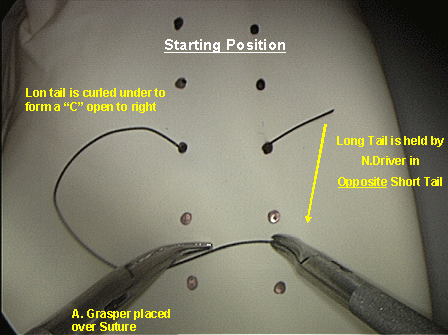
The needle holder (NH) (right hand) crosses over to the left side of the field and grasps the long tail. It is then brought over to the right side of the field, opposite the short tail and below it. The two tails combine to form a "C" configuration. (If tying with monofilament suture material, the NH should rotate counterclockwise so that the e loop is laid horizontally).
 |
| Continuous and interrupted suture |
 |
 |
|
| Starting position | First wrap |
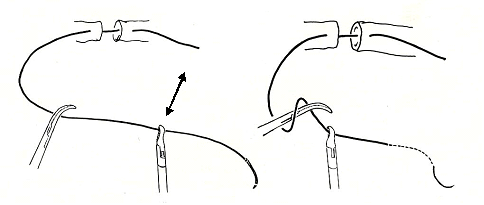
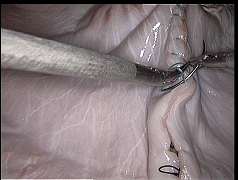
While holding the long tail with the NH (right hand), the assisting forceps/grasper (AG) (left hand) is placed over the suture and the long tail is wrapped once over then under the AG (NB: there should be a 3:1 ratio or greater between the length of the long tail and the short tail.)
 |
 |
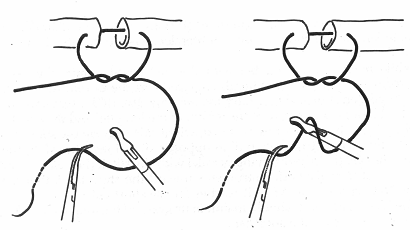
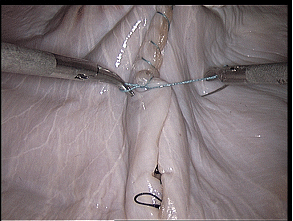
The AG (left hand) reaches over to the right side to grasp the short tail and then the two instruments pull in opposite directions, the AG to the left and the NH to the right, tying parallel with the entrance-exit points of the stitch. It is best to move both instruments toward the short tail rather having the NH "choke" the AG as it reaches for the short tail
|
|
|
|
The NH (right hand) should maintain its grasp of the long tail but the (left hand) now drops the short tail. The NH (right hand) still grasping the long tail, brings it over to the left side and hands it over the AF (left hand).
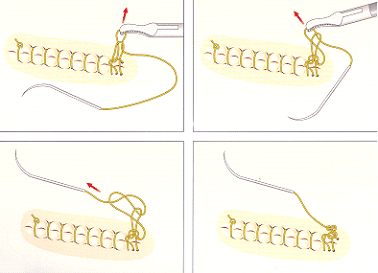
Second (opposing) flat knot
 |
 |
The (left hand) holds the long tail opposite the short tail (and below it), creating a "reversed C" configuration. Mirror image of the staring position. The NH (right hand) is placed over the reversed C and the thread is wrapped once over then under the instrument.
 |
||
 |
 |
|
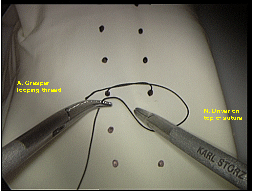
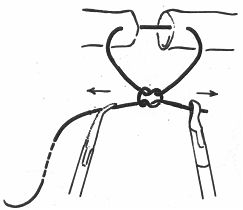
The NH
(right hand) reaches to the left side and grasps the short tail (again, move
both instruments together toward the short tail). The
instruments move in opposite directions pulling the short tail through the loop,
NH to the right and the AF to the left, parallel with the stitch. (It is
important that the instruments not cross each other because that would obscure
the field and errors could go undetected.)
The result
should be and certainly is a square knot.
 |
 |
|
 |
||
 |
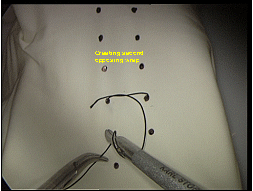
 |
|
The converted form of the square knot. The pulled suture leg becomes straight providing a "guide wire" on which the pretzel-shaped double loop can easily slide. The slipping configuration permits pushing the knot tighter.

After the knot is satisfactory the slipping form needs to be reconverted to a locking form. To ensure secure, locking knot an additional flat knot is placed on top.
[ back to top ]
Surgeon's knot
 |
| Double through with closing single twist |
If modest tension exists at the tissue edges to be approximated the first single throw easily unravels, therefore a double throw would be more secure. The surgeon's knot is secured with a single throw in the opposite direction. The disadvantage is that this becomes a permanent knot, which cannot be adjusted. One might be convinced that after placing a surgeon's knot the tissue is properly approximated, only to discover later that the stitch is loose. As with all permanent knots, if adjustments are needed, the surgeon's knot has to be cut out and replaced. Considering the labor intensiveness of suturing and knotting, the square-slip knot holds a clear advantage.
[ back to top ]
Granny knot
This is similar to a square knot and is made by combining an overhand throw with an other overhand throw. In other words the instruments do not change grip on the suture between the first and second flat knot. This is an unpredictable knot -sometimes it will slip and other times it will jam. It is usually the result of an incorrectly tied square knot.
[ back to top ]
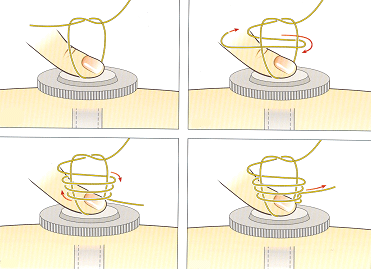
Twist knot
This knot was promoted because it avoids the complex choreography required by the square knot and could be tied with less developed skill. Using the needle holder the long tail is grasped and rotated 3 or more times around its axis, then the short tail is pulled through the loops created, pulled tight, forming a knot. Considerable effort is required to accomplish it correctly.
[ back to top ]
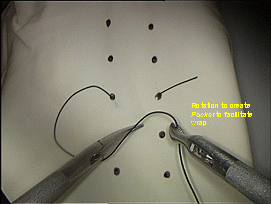
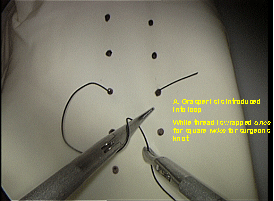
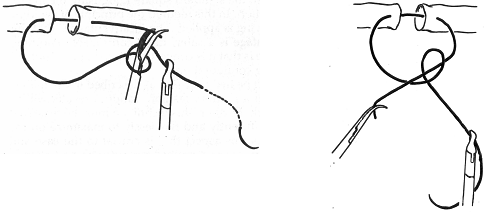
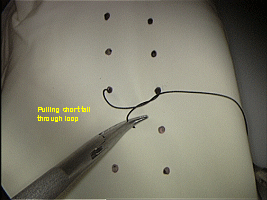
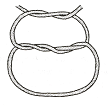
Lasso knot
 |
 |
 |
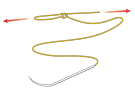 |
[ back to top ]
Slipping loop
To create this knot, the end of the suture must be doubled or tripled and pulling the end trough the wrap, tied approximately 3-5 mm from the end, creating a loop. After the needle is driven through the tissues it is brought back and passed through this loop. The tissues are approximated as the thread is pulled through the loop. The slip knot version can be tightened to hold and the permanent version will stay loose and is preferred for use in a continuous suture line.
[ back to top ]
Prelooped suture
Similar to a lasso knot, this is a commercially available product that includes the pre-looped suture and a plastic applicator/knot pusher. The pre-looped suture introduced to the surgical field through a port. The tissues are pulled together and secured by the tip of the applicator. Then the thread is held taut and the applicator handle is pushed, tightening the loop and creating the knot. The threads are then cut. Again, some degree of skill is required to apply this device and while it is user friendly it does not exclude the need for knot tying skills.
[ back to top ]
Three-legged tie
Securing a continuous suture line can be accomplished two ways. One possibility is to loosen the last loop and use it as the "short tail" for the traditional square or surgeon's knot tying of a 3-legged tie.
 |
 |
|
| Creating the first wrap, grasping the loosened up loop | ||
 |
||
|
Laying the first flat knot |
||
[ back to top ]
Aberdeen knot
 |
|
Creating loop |
 |
|
Tying knot |
Another method is the Aberdeen knot, which also requires loosening up the last loop. It is also known as the crochet or French knot. Although this knotting technique requires minimal rotation of the instrument, it still demands considerable skill to execute properly.
[ back to top ]
Purse string
 |
| Circular stitch |
Purse sting suture line is basically a
continuous circular stitch that goes in and out of the tissue in 5 mm intervals.
The purpose is to provide a circular tightening of tissue. Laparoscopically the
difficulty is in judging the entrance-exit points correctly.
It is recommended that the course
participants begin with the choreographed square knot, and once they have gained
confidence, they can try the other methods.
[ back to top ]
Extracorporeal knotting
 |
| Extracorporeal knot formation |
 |
| Pushing the knot intracorporeal |
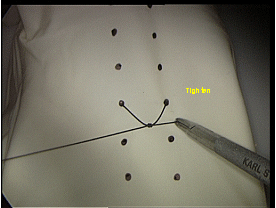
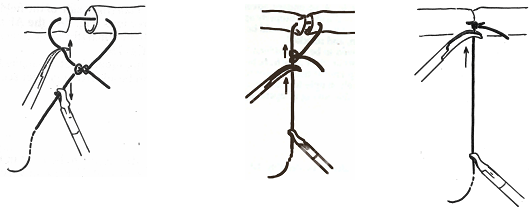
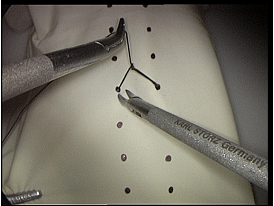
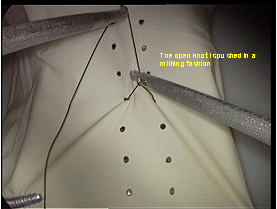
These knots are useful when the intracorporeal space is insufficient for the instrument tips to maneuver or if the surgeon lacks intracorporeal knotting skills. These knots work best with slippery monofilament suture materials. A common misconception exists about extracorporeal knots and that is that it requires less skill to tie than intracorporeal knots. On the contrary, to tie extracorporeal knots safely considerable skill and understanding of tissue texture are required. Knots tied with braided suture material have a tendency to lock up to soon, outside the desired location. The most common knot tied extracorporeal is the Roeder knot. Pre-tied ligatures available commercially generally use this knot and after one ligature has been made, this product can be used again by preparing another loop that is secured with the Roeder knot.
[ back to top ]
Sliding knot
A half-hitch is tied and then pushed down through the port with a special knot pusher into the appropriate position. Additional half-hitches are subsequently made in a similar fashion and pushed down on top of each other. While relatively simple, it is cumbersome, minimizes the surgeon's control of the stitch, and can cause excessive tension on the tissues.
[ back to top ]
Conclusion
For the surgeon to develop the same level of proficiency and dexterity in the endoscopic environment as he may possess in open surgery is not a simple matter. The use of proper instrumentation (hand, optical, and video), are essential. Participating in an in-depth, systematic training program in a laboratory setting is essential before applying endoscopic suturing techniques to humans. Successful acquisition of these skills requires that the surgeon be motivated to succeed and willing to invest the time and effort necessary to do so. Succumbing to the temptation of mechanical devices in lieu of acquiring the manual skills results in a questionable dependence on disposable technology and reduces the cost effectiveness of the minimally invasive approach. It is the adoption of endoscopic skills by the surgeon that will expand the surgeon’s capability of performing increasingly advanced endoscopic surgical procedures.
[ back to top ]